Blog

How to Remove IIS Web Server from a Windows Server or VPS (2012, 2008)

Sometimes you will find that Windows Server 2012 R2 or Windows Server 2008 R2 is installed with IIS, Microsoft’s web server (Internet Information Services), pre-installed. If you want to remove IIS and its related configuration, simply follow the steps below.

How to Uninstall IIS from a Windows Server or VPS

1. Log in to your Windows Server via remote desktop, or locally. An account with Administrator privileges is needed.

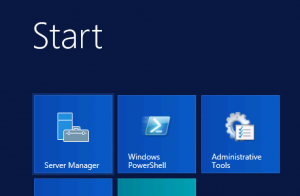
2. Open Server Manager from the Start menu.

Screen Shot 2015-07-20 at 12.42.55 PM

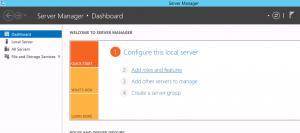
3. Click “Add Roles and Features” to open the Roles/Features Wizard.

Screen Shot 2015-07-20 at 12.43.52 PM

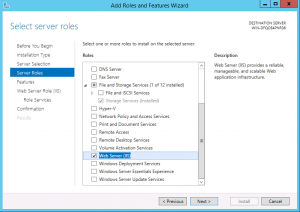
4. Click “Next” through the wizard, selecting nothing, until you reach the “Server Roles” section. On this pane, look for “Web Server (IIS)” in the list of Roles, and de-select it.

Screen Shot 2015-07-20 at 12.45.02 PM

5. Click Next through the remainder of the wizard, and confirm the Installation (actually an uninstallation). Once the wizard has completed, IIS will be removed from your system.

That’s it! A reboot may be required to finalize the uninstallation.

This guide applies to:

  • Windows Server 2012 R2
  • Windows Server 2008 R2
Posted in Guides & How To's, Tech Support, VPS Hosting, Windows Server, Windows VPS | Tagged , , , , , | Leave a comment

How to Install .NET Framework 4.5 on Windows 7, 8, 2008, or 2012 VPS

You may find that software you are installing requires Microsoft .NET Framework 4.5 or 4.6. If these are not pre-installed on your Windows 7, Windows 8, Windows Server 2008, or Windows Server 2012 system, they are easy to install by using the links below.

  • To download .NET Framework 4.5 for Server 2008 R2 or Windows 7: Microsoft Download Link
    • .NET 4.5 is pre-installed in Server 2012 and Windows 8.
  • To download .NET Framework 4.6 for Windows 8, Server 2012 R2, and all earlier systems: Microsoft Download Link
    • .NET 4.6 is pre-installed in Windows 10 and Server 2016.


Simply use the appropriate link to download the installation package to your Windows server or Windows VPS. The installation should run without any other dependencies.

If you require any help with installation on your Windows VPS, please contact us!

This guide applies to:

  • Windows Server 2012 R2
  • Windows Server 2008 R2
  • Windows 8 & 8.1
  • Windows 7
Posted in Guides & How To's, Tech Support, Windows Server, Windows VPS | Tagged , , , | 2 Responses

Linux Directory Structure Explained (Common Folder Explanations)

Every Linux server uses approximately the same root folder hierarchy, but many users don’t know what all of the folders are for. These are the folders that contain everything on the server, and everything required by the operating system, so it is a bit more complicated than “Pictures”, “Desktop”, etc.!

All of the basic Linux directories in the hierarchy have an important purpose, but the nice thing is that for most uses, nothing needs to be added to the root hierarchy. Users can use the existing folders to add their own files, scripts, and software.

Below is a list of the most common Linux root directories, and an explanation of the purpose of each directory:

Common Linux Root Directories

/bin : All the executable binary programs required during boot-up, repair, files required to run into single-user-mode, and other important, basic commands like cat, du, df, tar, rpm, wc, history, etc.

/boot : Holds important files during boot-up process, including the system kernel.

/dev : Contains device files for all the hardware devices on the machine, for example storage volumes.

/etc : Contains configuration files and startup/status/shutdown scripts for applications.

/home : The system users’ home directory for user files. Each new user added to the system will correspond to a new folder in /home.

/lib : The Lib directory contains kernel modules and shared library images required to boot the system and run commands in the root file system.

/lost+found : This directory collects files that may be damaged, or need repair, during a crash or improper shutdown.

/mnt : Temporary mount directory for mounting file systems.

/opt : Optional is abbreviated as opt. Contains third-party software, code for compiling software, and user-installed software.

/proc : A virtual and pseudo file-system which contains information about running process with a particular Process ID (pid).

/root : This is the home directory of root user, and should never be confused with ‘/‘. It is used for the root user’s ‘personal’ files.

/sbin : Contains binary executable programs required by System Administrator for maintenance, like iptables, fdisk, ifconfig, swapon, reboot.

/sys : Modern Linux distributions include a /sys directory as a virtual filesystem, which stores and allows modification of the devices connected to the system.

/tmp : The system’s temporary directory, accessible by users and root. Stores temporary files for user and system until the next reboot.

/usr : Contains executable binariesdocumentationsource code, and libraries for second-level programs.

/var : Stands for variable. The contents of this folder are expected to grow. This directory contains logslockspoolmail, and temp files.

Posted in Guides & How To's, Linux VPS, Tech Support | Tagged , | Leave a comment

The new Secure Client Panel is Live!

Today we completed an update to our Secure Client Panel. All Windows and Linux VPS users will now see a new and improved service management page.

To access the new panel, log in to the Secure Client Panel and go to Services > Services Dashboard. After selecting one of your VPS instances, you will see the new integrated panel.

The new instance management panel brings more VPS management functions into one place, and we hope it provides an easier and more streamlined way to use the most common management functions. We will continue to develop the panel with the aim of expanding the features available there.

Please send us a message if you encounter any bugs in the new panel, or if there is a feature you would like to see there.

Sincerely,

SolVPS Management

Posted in About SolVPS, Announcements, Company News, Maintenance & Service Updates | Tagged , , , , | Leave a comment

Xen vs. OpenVZ Comparison: Performance, which is a better VPS?

Xen and OpenVZ are two popular, but different virtualization technologies. Each one is a back-end for VPS hosting, and many web hosts, as well as small businesses, are using OpenVZ or Xen to power VPS hosting infrastructure. 

Below is a summary of the key differences that define these common hypervisors:

Xen OpenVZ
Virtualization Type Bare metal (Hardware virt.) Hosted (OS virt.)
Source Open-source Open-source
Target usage Enterprise Personal / Private usage
Supported guest OS Linux / Windows / BSD Linux
Resource Allocation Dedicated (Reserved) Shared (As-available)

Xen

Xen is a full virtualization solution that virtualizes a host server’s hardware for allocation to different virtual machines. In contrast to other pseudo-virtualization methods, Xen’s virtualization provides complete segmenting and isolation of physical RAM, and other resources. A virtual server running in a Xen instance will have almost exactly the same characteristics as a native installation of the OS on dedicated hardware, with a dedicated kernel, memory, CPU, as well as ‘native’ network and storage devices.

Strengths of Xen:

  • Security: VM users cannot ‘escape’ or escalate beyond their containers, which are fully isolated.
  • Resource dedication: VM instances use only the resources they are allocated.
  • Hardware Virtualization: Operating systems run natively and see native hardware devices
  • Versatility: Supports Windows and almost any other OS
  • Support: Sponsored by Citrix, Amazon, and others

OpenVZ

OpenVZ is a more lightweight platform that uses host-level (operating system level) virtualization rather than full hardware virtualization. This results in a relatively thin later of virtualization on top of the host server’s operating system, where guest VPS instances will directly share the same core Linux kernel and devices as the host server. This characteristic of OpenVZ, which creates VPS instances that resemble “jailed” instances more than true virtual machines, exposes the system to security and performance risks that are less suited for enterprise or public deployments.

Strengths of OpenVZ:

  • Ease of management
  • Low overhead
  • Seamless resource additions (no VM reboot required)

Performance

Even when considering all aspects of system performance, it is difficult to say whether Xen or OpenVZ instances have better performance. With two containers of equivalent size, in a simple test, OpenVZ may perform better due to its lower overhead (less resources reserved for background operation of the VM). In addition, depending on the host configuration, OpenVZ instances can use resources of the host system beyond what they are assigned. This can result in performance benefits when instances “burst” resources, but may also introduce performance problems when multiple instances are over-using resources simultaneously.

By contrast, Xen instances have dedicated and fixed resource allocations, imposing a relatively fixed limit to the amount of host resources they may consume. Therefore, when we consider a host system with many VPS instances running simultaneously, Xen provides more predictable performance that is guaranteed for each instance. For this reason it is our opinion that Xen virtualization provides better performance in real-world usage.

Interested in trying a VPS?

Check out our VPS hosting service, proudly based on Xen. We host both Linux VPS and Windows VPS instances on our infrastructure in New York, USA and London, UK.

Posted in About SolVPS, Featured Guides, Tech Support, VPS Hosting | Tagged , , , , | Leave a comment

How to: Open Ports on Windows Server (VPS or Dedicated Server)

Windows Firewall is a utility included with all recent versions of Windows. It includes options to open ports, close ports, and allow specifics programs and services through the system firewall. In this guide we will show you how to open a specific port number with on a Windows VPS or dedicated server.

How To

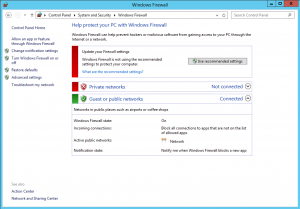
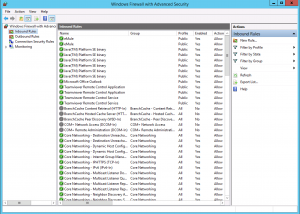
First, open Control Panel and navigate to System & Security. Then, open Windows Firewall. In the left-hand menu, click “Advanced settings”.

Screen Shot 2015-06-29 at 4.22.09 PM


The Advanced Security panel will appear. In the left-hand menu, there are two types of rules:

  • Inbound Rules: Rules that deny or allow traffic coming in to the server from outside.
  • Outbound Rules: Rules that deny or allow traffic going out to the network from the server.

Screen Shot 2015-06-29 at 4.23.06 PM


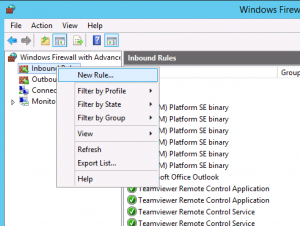
It is often useful to create both an inbound rule and an outbound rule for your application’s port. Repeat the following steps 2 times, once for Inbound, and once for Outbound. First, right-click “Inbound Rules” and select “New Rule…” 

Screen Shot 2015-06-29 at 4.23.24 PM


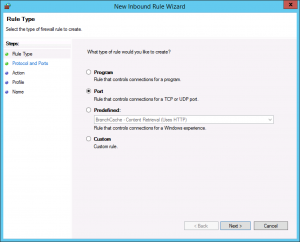
Choose the type of rule to setup. We are defining a specific Port number.

Screen Shot 2015-06-29 at 4.23.41 PM


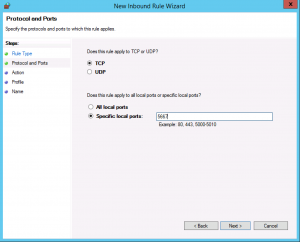
Type the port number your application uses, and choose TCP or UDP protocol (most applications use TCP).

Screen Shot 2015-06-29 at 4.24.01 PM


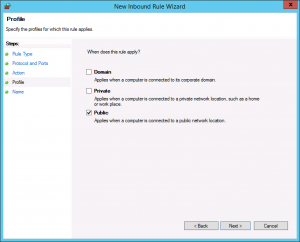
Select whether to apply the rule only on local (private) networks, or on public networks as well. You will want to select Public, most likely.

Screen Shot 2015-06-29 at 4.24.39 PM


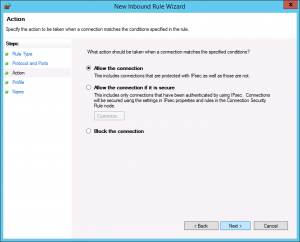
Finally, select whether this rule is for explicitly allowing connections on this port, or explicitly blocking connections on this port.

Screen Shot 2015-06-29 at 4.24.18 PM

That’s it! The firewall rule will go into effect immediately, opening the port to traffic to (or from) your server. As we noted above, be sure to repeat the process as an Outbound rule, if you want to open a port for both sending and receiving.


Need help?

We are happy to help with opening ports and other Windows Server configuration questions!


This guide applies to:

  • Windows Server 2012 R2
  • Windows Server 2008 R2
  • Windows Server 2008
  • Windows 8
  • Windows 7
Posted in Guides & How To's, Tech Support, Windows Server, Windows VPS | Tagged , , , , , | 2 Responses

Extending the C: Partition in Windows Server 2003 or XP

If you use a server or PC with Windows XP, or Windows Server 2003 R2, it can be difficult to expand the C: partition to occupy new disk space. This is sometimes an issue with our Windows VPS instances, because additional storage space can be added to the server after the initial installation.

The typical process of using diskmgmt.msc to ‘Extend’ the partition is, in most cases, simply not available in Windows Server 2003 R2. So, how can we extend a partition in Windows Server 2003 / XP?

Solution

The easiest way to extend partitions on Windows Server 2003 or Windows XP is to use a third-party partitioning software. We have had good luck with the freeware Aomei Partition Assistant Lite, available for download from CNET here: http://download.cnet.com/Aomei-Partition-Assistant-Lite-Edition/3000-2248_4-75629288.html

After downloading and installing the software, you can select the C: partition (the main partition on your system), and extend it using the software.

Need help?

Please contact us, we will be happy to help configure your server!

Posted in Guides & How To's, Tech Support, Windows Server, Windows VPS | Tagged , , , , | Leave a comment

cPanel License Key Update Script (How to Update cPanel License)

Since we’re always looking for it, here is the cPanel license key update script. Simply run the command below while logged in to your cPanel VPS or dedicated server via shell (SSH).

/usr/local/cpanel/cpkeyclt

Note: If you just want to update cPanel, run:

/scripts/upcp

Posted in cPanel/WHM, Guides & How To's, Linux VPS, Tech Support | Tagged , , | Leave a comment

How to Install LiteSpeed on a cPanel Server in 10 Minutes

LiteSpeed Web Server is a high-performance web server that is an alternative to Apache, yet fully compatible with existing Apache configuration files. It is very well suited to high traffic websites, and those that use a large number of scripts.

This guide will show you how to install LiteSpeed on a cPanel VPS or dedicated server in just 5-10 minutes. Once completed, you will have a LiteSpeed-powered web server ready for action, running on top of cPanel.

LiteSpeed is fully compatible with cPanel, and we start with installing a cPanel plug-in that adds a LiteSpeed control panel inside WHM.

How to Install LiteSpeed with cPanel

1. Access your Linux VPS or dedicated server via shell (SSH) with root credentials. Download and install the LiteSpeed plug-in for cPanel:

cd /usr/src; curl http://www.litespeedtech.com/packages/cpanel/lsws_whm_plugin_install.sh | sh

2. Log in to WHM and navigate to Plugins > LiteSpeed Web Server Plugin.

3. Click “Install LiteSpeed Web Server”. Enter your LiteSpeed license key and a username/password for the LiteSpeed admin panel. The other options can be left at their defaults. Click Next to install LiteSpeed.

4. Important: Before starting LiteSpeed, you need to build a PHP binary for LiteSpeed that matches your existing Apache/PHP build. To do this, click “Build matching PHP” from the LiteSpeed plugin homepage.

5. Return to the LiteSpeed plugin page and cick “Switch to LiteSpeed” to enable LiteSpeed on your server (disables Apache).

That’s it! Now your web server is running litespeed and lsphp5.

Want free installation?

We provide with instant setup, free installation, and ongoing support for both cPanel and LiteSpeed licenses, compatible with all of our Linux VPS packages.

Posted in cPanel/WHM, Guides & How To's, Linux VPS, Tech Support | Tagged , , , , | Leave a comment

Differences in Windows Server 2016 vs. Server 2008 R2

Earlier this month, Microsoft announced the release of Windows Server 2016 Technical Preview 2. Microsoft has outlined some of the key new features in Windows Server 2016, which you can see below.

Windows Server 2016 Preview is now available as an operating system choice to install on existing VPS instances.

To reinstall a virtual server with Windows Server 2016, choose ‘Reinstall’ from the VPS Panel.

This isn’t a full list of what’s new in Windows Server 2016, but it offers you a general idea of Microsoft’s focus on businesses. As you can see, Windows Server 2016 features a variety of improvements ranging from security to storage and management.

  • Compute and Virtualization: Simplified upgrades, new installment options, and increased resilience, helping you ensure the stability of the infrastructure without limiting agility.
  • Networking: Continued investment to make networking as flexible and cost-effective as possible while ensuring high performance.
  • Storage: Expanding capabilities in software-defined storage with an emphasis on resilience, reduced cost, and increased control.
  • Security and Assurance: Protecting against today’s threats with a “zero-trust” approach to security that is rooted in the hardware.
  • Management: Ongoing advances to simplify server management and increase consistency in approach.
  • New features for IIS, RDS, and AD.

Windows Server 2016 is the newest release of the Windows Server operating system, and will be the server counterpart to Windows 10. Server 2016 is currently not released publicly, nor fully tested and optimized on our virtual server hosting platform, but we encourage users to try it out. Windows Server 2016 Preview is now available as an operating system choice to install on existing VPS instances.


Posted in Announcements, Company News, Tech Support, Windows Server, Windows VPS | Tagged , , , , , , | Leave a comment


Questions? We're here to help.