Blog

Switching to MPM Event / MPM Worker in Apache (CentOS VPS/Server)

Apache MPM (Multi-Processing Modules) are modules for Apache web server that control the creation of child processes. There are a few different varieties of MPMs available, each with its own type of child process management. The default Apache MPM is Prefork.

Follow the guide below to Disable Prefork MPM and Enable Event MPM on Apache web server. This guide is written for CentOS/RHEL, but should also work with any Apache installation on other Linux operating systems.

Enable Event MPM in Apache

First edit Apache MPM configuration file in your favorite text editor.

vim /etc/httpd/conf.modules.d/00-mpm.conf

Comment out the LoadModule line for mpm_prefork_module, mpm_worker_module, and uncomment the LoadModule line for mpm_event_module in configuration, as shown below.

#LoadModule mpm_prefork_module modules/mod_mpm_prefork.so
#LoadModule mpm_worker_module modules/mod_mpm_worker.so

LoadModule mpm_event_module modules/mod_mpm_event.so 


After making above changes, save the file and restart the Apache service.

systemctl restart httpd

Check Active MPM in Apache

Now you have successfully enabled Event MPM in your Apache server. To verify current MPM enabled on your server use following command.

[root@VPS ~]# httpd -V | grep MPM
Server MPM:     event

That’s it! The MPM has been successfully switched to MPM – Event.

This article applies to:

  • Apache on CentOS Linux
  • Apache on RHEL
  • Apache on Fedora Linux
Posted in cPanel/WHM, Linux VPS, Tech Support, VPS Hosting | Leave a comment

cPanel/WHM run backup manually from Shell

After configuring backups in WHM > Backup Configuration, use the command below to trigger a backup manually, if you don’t want to wait for the next scheduled backup to run.

This command must be run from the server Shell. Log in to shell via Putty, Terminal, or a Shell (SSH) client.

Then, run the command below:

/usr/local/cpanel/bin/backup

The backup process will begin running immediately, and you can track the progress in the backup logs located at: /usr/local/cpanel/logs/cpbackup

This article applies to:

Posted in Guides & How To's, Linux VPS, VPS Hosting | Leave a comment

Port Forwarding on Windows Server or VPS

Windows Firewall is a utility included with all recent versions of Windows. It includes options to open and close ports, allow specific ports and programs through the firewall, which is the equivalent of “port forwarding” on a Windows Server or Windows VPS that is not behind a NAT device. In this guide we will show you how to forward a specific port on a Windows VPS or dedicated server.

How To Port Forward on Windows VPS

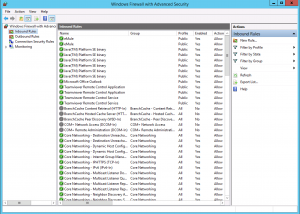
First, open Control Panel and navigate to System & Security. Then, open Windows Firewall. In the left-hand menu, click “Advanced settings”.

Screen Shot 2015-06-29 at 4.22.09 PM

The Advanced Security panel will appear. In the left-hand menu, there are two types of rules:

  • Inbound Rules: Rules that deny or allow traffic coming in to the server from outside.
  • Outbound Rules: Rules that deny or allow traffic going out to the network from the server.

Screen Shot 2015-06-29 at 4.23.06 PM

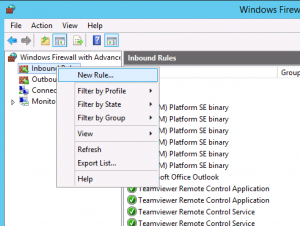
It is often useful to create both an inbound rule and an outbound rule for your application’s port. Repeat the following steps 2 times, once for Inbound, and once for Outbound. First, right-click “Inbound Rules” and select “New Rule…” 

Screen Shot 2015-06-29 at 4.23.24 PM

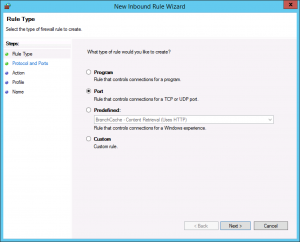
 Choose the type of rule to setup. We are defining a specific Port number.

Screen Shot 2015-06-29 at 4.23.41 PM

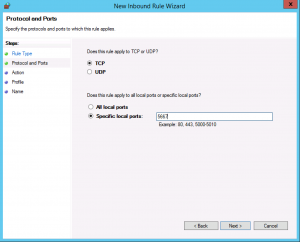
Type the port number your application uses, and choose TCP or UDP protocol (most applications use TCP).

Screen Shot 2015-06-29 at 4.24.01 PM

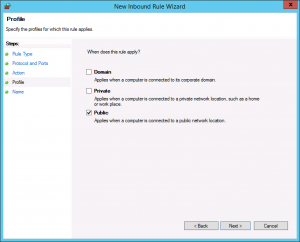
Select whether to apply the rule only on local (private) networks, or on public networks as well. You will want to select Public, most likely.

Screen Shot 2015-06-29 at 4.24.39 PM

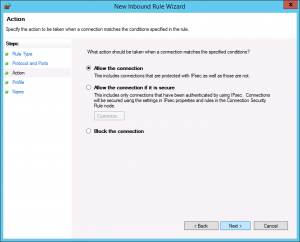
Finally, select whether this rule is for explicitly allowing connections on this port, or explicitly blocking connections on this port.

Screen Shot 2015-06-29 at 4.24.18 PM

That’s it! The firewall rule will go into effect immediately, opening the port to traffic to (or from) your server. As we noted above, be sure to repeat the process as an Outbound rule, if you want to open a port for both sending and receiving.

Need help?

We are happy to help with opening ports and other Windows Server configuration questions!

This guide applies to:

  • Windows Server 2016
  • Windows Server 2012 R2
  • Windows Server 2008 R2
  • Windows Server 2008
  • Windows 8
  • Windows 7
Posted in Tech Support, VPS Hosting, Windows Server, Windows VPS | 4 Responses

Running 32-bit Programs on Windows Server 2016 or 2012 R2 64-bit

Running 32-bit Programs

Ideally, running 32-bit applications on 64-bit versions of Windows Server will “just work.” 64-bit editions of Windows are compatible with 32-bit programs by default, and the C:\Program Files (x86) folder is designated for these applications. The system runs 32-bit applications as part of the default Windows OS.

If you are having trouble launching an application on 64-bit Windows, try the steps below to run a 32-bit program on Windows Server.

1. Check the program is installed to C:\Program Files (x86). If not, Uninstall and then Install the program again with C:\Program Files (x86) selected as the installation path.

2. Launch the program from the 32-bit emulated Command Prompt. Click Start > Run, and enter:

%SystemRoot%\SYSWOW64\cmd.exe

Command Prompt should open. Now type the path to your installed 32-bit application .exe and press enter.

WOW64 is the x86 emulator that allows 32-bit Windows-based applications to run seamlessly on 64-bit Windows. WOW64 is provided with the operating system and does not have to be explicitly enabled. 

For more info, visit: https://msdn.microsoft.com/en-us/library/windows/desktop/aa384249%28v=vs.85%29.aspx?f=255&MSPPError=-2147217396

Running 16-bit Programs

Note that 64-bit Windows does not support running 16-bit Windows-based applications. The primary reason is that handles have 32 significant bits on 64-bit Windows. Therefore, handles cannot be truncated and passed to 16-bit applications without loss of data. Attempts to launch 16-bit applications fail with the following error: ERROR_BAD_EXE_FORMAT.

This article applies to:

  • Windows Server 2016
  • Windows Server 2012 R2
  • Windows Server 2008 R2
Posted in VPS Hosting, Windows Server, Windows VPS | 1 Response

How to Install IIS from Desktop GUI on Windows Server 2016 / VPS

Installing IIS on Windows Server 2016

If your server has the graphical user interface component installed you can also install IIS by following these steps.

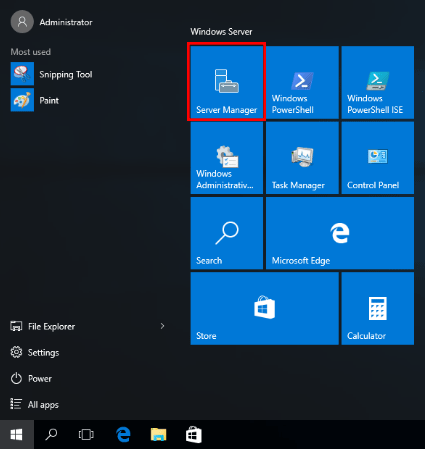
  1. Open Server Manager, this can be found in the start menu. If it’s not there simply type “Server Manager” with the start menu open and it should be found in the search.server-manager-windows-2016
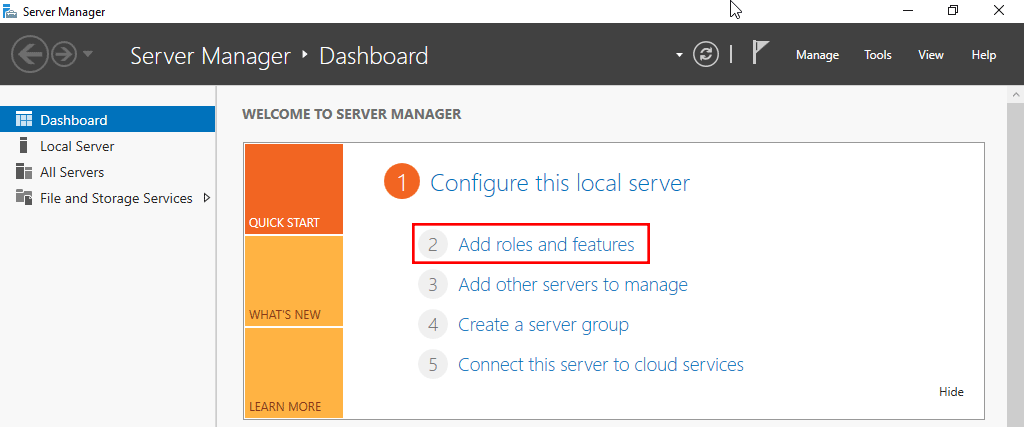
  2. Click the “Add roles and features” text.server-manager-add-roles-and-features-2016
  3. On the “Before you begin” window, simply click the Next button.
  4. On the “Select installation type” window, leave “Role-based or feature-based installation” selected and click Next.
  5. As we’re installing to our local machine, leave “Select a server from the server pool” with the current machine selected and click Next. Alternatively you can select another server that you are managing from here, or a VHD.
  6. From the “Select server roles” window, check the box next to “Web Server (IIS)”. Doing this may open up a new window advising that additional features are required, simply click the “Add Features” button to install these as well. Click Next back on the Select server roles menu once this is complete.
  7. We will not be installing any additional features at this stage, so simply click Next on the “Select features” window.
  8. Click Next on the “Web Server Role (IIS)” window after reading the information provided.
  9. At this point on the “Select role services” window you can install additional services for IIS if required. You don’t have to worry about this now as you can always come back and add more later, so just click Next for now to install the defaults.
  10. Finally on the “Confirm installation selections” window , review the items that are to be installed and click Install when you’re ready to proceed with installing the IIS web server.No reboot should be required with a standard IIS installation, however if you remove the role a reboot will be needed.
  11. Once the installation has succeeded, click the close button. At this point IIS should be running on port 80 by default with the firewall rule “World Wide Web Services (HTTP Traffic-In)” enabled in Windows firewall automatically.
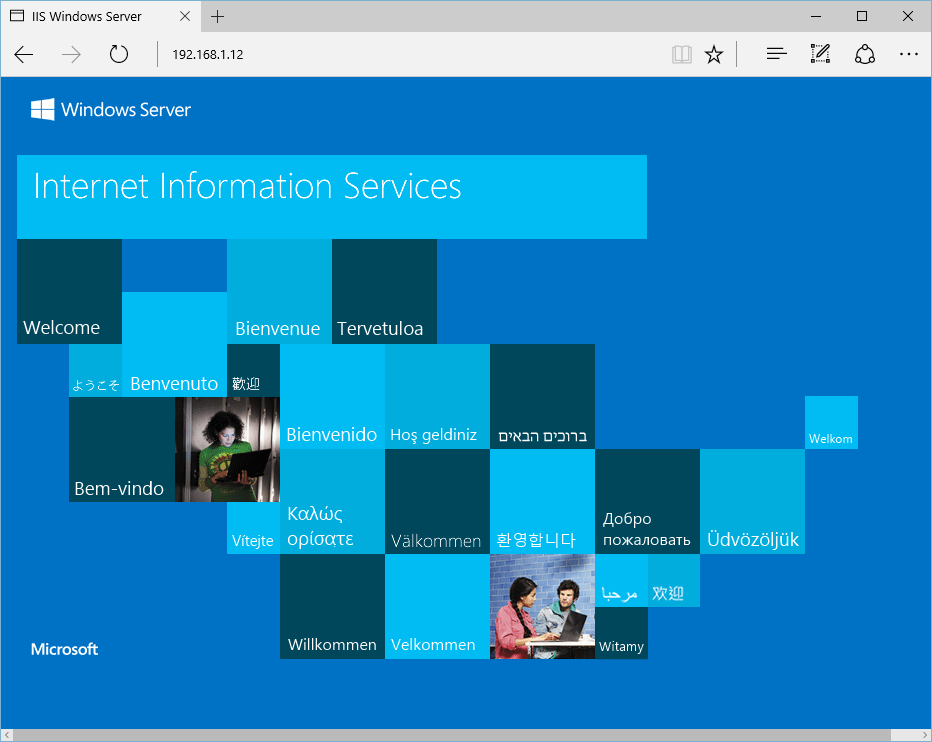
  12. We can perform a simple test by opening up a web browser and browsing to the server that we have installed IIS on. You should see the default IIS page. default-iis-website

This article applies to:

  • Windows Server 2016
Posted in Tech Support, VPS Hosting, Windows Server, Windows VPS | Leave a comment

SQL Server 2016 Version Differences & Licensing: Web, Standard, and Enterprise

SQL Server 2016 includes more features than ever before, but it can be difficult to find the differences between versions of SQL Server.

The primary difference is the licensing model, which limits how SQL Server may be used on the server it is installed on. A majority of SQL Server features are available in both SQL Server Web and Standard editions. There are some differences around mirroring (Web can only serve as a witness), publishing (Web can only subscribe), and performance (Web does not come with SQL Profiler).

SQL Server Versions

SQL Server edition Definition
Enterprise The premium offering, SQL Server Enterprise edition delivers comprehensive high-end datacenter capabilities with blazing-fast performance, unlimited virtualization, and end-to-end business intelligence — enabling high service levels for mission-critical workloads and end user access to data insights.
Standard SQL Server Standard edition delivers basic data management and business intelligence database for departments and small organizations to run their applications and supports common development tools for on-premise and cloud — enabling effective database management with minimal IT resources.
Web SQL Server Web edition is a low total-cost-of-ownership option for Web hosters and Web VAPs to provide scalability, affordability, and manageability capabilities for small to large scale Web properties.

SQL Server Licensing

SQL Server edition Licensing Format
Enterprise Licensed per User (CAL) or per CPU. Each license (User CAL) covers one authorized user who will access the database server. It is required to license all users who will have access to the database server. Alternatively, “unlimited” license may be purchased per CPU. It is required to license all CPUs on the server where SQL Server is running. For pricing, see SQL Server Hosting.
Standard Licensed per User. Each license (User CAL) covers one authorized user who will access the database server. It is required to license all users who will have access to the database server. For pricing, see SQL Server Hosting.
Web Licensed per 2 CPU cores. Licenses are provided in packs of 2, so 1 license covers 2 CPU cores. It is required to license all cores on the server where SQL Server is running. For pricing, see SQL Server Hosting.

We provide licensing for hosted cloud servers, for all editions of SQL Server 2016. For more info, please visit SQL Server Hosting.

Scale Limits

Feature Enterprise Standard Web Express with Advanced Services Express
Maximum compute capacity used by a single instance – SQL Server Database Engine1 Operating system maximum Limited to lesser of 4 sockets or 24 cores Limited to lesser of 4 sockets or 16 cores Limited to lesser of 1 socket or 4 cores Limited to lesser of 1 socket or 4 cores
Maximum compute capacity used by a single instance – Analysis Services or Reporting Services Operating system maximum Limited to lesser of 4 sockets or 24 cores Limited to lesser of 4 sockets or 16 cores Limited to lesser of 1 socket or 4 cores Limited to lesser of 1 socket or 4 cores
Maximum memory for buffer pool per instance of SQL Server Database Engine Operating System Maximum 128 GB 64 GB 1410 MB 1410 MB
Maximum memory for Columnstore segment cache per instance of SQL Server Database Engine Unlimited memory 32 GB2 16 GB2 352 MB2 352 MB2
Maximum memory-optimized data size per database in SQL Server Database Engine Unlimited memory 32 GB2 16 GB2 352 MB2 352 MB2
Maximum memory utilized per instance of Analysis Services Operating System Maximum Tabular: 16 GBMOLAP: 64 GB N/A N/A N/A
Maximum memory utilized per instance of Reporting Services Operating System Maximum 64 GB 64 GB 4 GB N/A
Maximum relational database size 524 PB 524 PB 524 PB 10 GB 10 GB

1 Enterprise Edition with Server + Client Access License (CAL) based licensing (not available for new agreements) is limited to a maximum of 20 cores per SQL Server instance. There are no limits under the Core-based Server Licensing model. For more information, see Compute Capacity Limits by Edition of SQL Server.

2 Applies to SQL Server 2016 SP1.

Source: https://docs.microsoft.com/en-us/sql/sql-server/editions-and-components-of-sql-server-2016

Visit docs.microsoft.com for up-to-date documentation on Microsoft SQL Server 2016.

This article applies to:

Posted in Featured Guides, VPS Hosting, Windows Server, Windows VPS | Leave a comment

Installing Atlassian Confluence on CentOS Linux (RHEL) Server or VPS

This guide covers how to install Confluence, the team collaboration software from Atlassian, on a RHEL or CentOS server. The guide has been tested on CentOS 7.

How to Install Confluence

Prerequisites

We will be using a CentOS 7 Linux VPS for this tutorial. Before proceeding you should check the minimum system requirements for the version of Confluence you are installing.

The server on which you will install Confluence will need a basic LAMP stack installed (Linux, Apache, MySQL & PHP).

Use the following one-line command for an expedient set up of your LAMP server on your CentOS server:

sudo sh -c "yum install httpd httpd-devel mysql mysql-server mysql-devel php php-mysql php-common php-gd php-mbstring php-mcrypt php-devel php-xml -y; service mysqld start && mysql_secure_installation && service mysqld restart && service httpd start && chkconfig httpd on && chkconfig mysqld on"

Confluence Installation

UPDATE THE SYSTEM

As always, make sure your server is fully up-to-date with the command below:

# yum update

Also, install a text editor of your choice. We will use nano as our text editor:

# yum install nano
INSTALL AND SETUP JAVA

Confluence requires JAVA in order to run. We are going to install Oracle’s JAVA JDK 8. Use the command below to download JDK 8:

# wget --no-cookies --no-check-certificate --header "Cookie: oraclelicense=accept-securebackup-cookie" "http://download.oracle.com/otn-pub/java/jdk/8u60-b27/jdk-8u60-linux-x64.rpm" -O /opt/jdk-8-linux-x64.rpm

Install JAVA:

# yum install /opt/jdk-8-linux-x64.rpm

Configure the JAVA package using the alternatives command:

# JDK_DIRS=($(ls -d /usr/java/jdk*))

# JDK_VER=${JDK_DIRS[@]:(-1)}

# alternatives --install /usr/bin/java java /usr/java/"${JDK_VER##*/}"/jre/bin/java 20000

# alternatives --install /usr/bin/jar jar /usr/java/"${JDK_VER##*/}"/bin/jar 20000

# alternatives --install /usr/bin/javac javac /usr/java/"${JDK_VER##*/}"/bin/javac 20000

# alternatives --install /usr/bin/javaws javaws /usr/java/"${JDK_VER##*/}"/jre/bin/javaws 20000

# alternatives --set java /usr/java/"${JDK_VER##*/}"/jre/bin/java

# alternatives --set javaws /usr/java/"${JDK_VER##*/}"/jre/bin/javaws

# alternatives --set javac /usr/java/"${JDK_VER##*/}"/bin/javac

You can check if JAVA has been properly setup on your server using:

# java -version
INSTALL MYSQL

You need to install MySQL from the community repository.

Download and install the repo:

# wget http://repo.mysql.com/mysql-community-release-el7-5.noarch.rpm

# sudo rpm -ivh mysql-community-release-el7-5.noarch.rpm

Update the package index:

# yum update

Now install and start MySQL:

# yum install mysql-server mysql-client

# systemctl start mysqld

Enable MySQL to start on boot:

# systemctl enable mysqld

With the MySQL installation out of our way, we can now create a database for the Confluence installation. But first, run the mysql_secure_installation script to harden your MySQL server:

# mysql_secure_installation

Configure it like this:

- Set root password? [Y/n] y
- Remove anonymous users? [Y/n] y
- Disallow root login remotely? [Y/n] y
- Remove test database and access to it? [Y/n] y
- Reload privilege tables now? [Y/n] y

Now, log into MySQL as root and create the database:

# mysql -u root -p

mysql> CREATE DATABASE confluence CHARACTER SET utf8 COLLATE utf8_bin;
Query OK, 1 row affected (0.00 sec)

mysql> GRANT ALL PRIVILEGES ON confluence.* TO 'confluenceuser'@'localhost' IDENTIFIED BY 'your_password';
Query OK, 0 rows affected (0.00 sec)

mysql> flush privileges;
Query OK, 0 rows affected (0.00 sec)

mysql> exit
INSTALL CONFLUENCE

You need to download the appropriate Confluence ‘Linux 64-bit/ 32-bit installer’ from their download page.
We are using a 64-bit CentOS 7 VPS, so we will use the 64-bit installer.

You can use the arch command to check whether you are running a 64 or 32 bit OS on your server. For example our CentOS 7 OS is 64-bit:

[root@linuxvps /]# arch
x86_64

Ok, now let’s get down to business. We are downloading the 64-bit installer:

# wget https://downloads.atlassian.com/software/confluence/downloads/atlassian-confluence-5.9.1-x64.bin

Make the bin file executable:

# chmod a+x atlassian-confluence-5.9.1-x64.bin

Run the installer with ‘root‘ user privileges and the installation will create a dedicated Linux user account named ‘confluence‘ which will be used to run Confluence:

# ./atlassian-confluence-5.9.1-x64.bin

You will get the following output:

Unpacking JRE ...
Starting Installer ...
Dec 03, 2015 10:43:54 AM java.util.prefs.FileSystemPreferences$1 run
INFO: Created user preferences directory.

This will install Confluence 5.9.1 on your computer.
OK [o, Enter], Cancel [c]

Press enter.

Choose the appropriate installation or upgrade option.
Please choose one of the following:
Express Install (uses default settings) [1],
Custom Install (recommended for advanced users) [2, Enter],
Upgrade an existing Confluence installation [3]

You can proceed with a custom install if you want, but we will enter 1 in our CLI for an Express install with the default settings:

See where Confluence will be installed and the settings that will be used.
Installation Directory: /opt/atlassian/confluence
Home Directory: /var/atlassian/application-data/confluence
HTTP Port: 8090
RMI Port: 8000
Install as service: Yes
Install [i, Enter], Exit [e]

Press Enter again to start the Confluence installation which will give you the below output:

Extracting files ...

Please wait a few moments while Confluence starts up.
Launching Confluence ...
Installation of Confluence 5.9.1 is complete
Your installation of Confluence 5.9.1 is now ready and can be accessed via
your browser.
Confluence 5.9.1 can be accessed at http://localhost:8090
Finishing installation ...

As you can see, Confluence is listening on port 8090. You can change this and the URI path in the server.xml file. And indeed, we need to change the URL from which we will access Confluence. Therefore, enter the conf directory:

# cd /opt/atlassian/confluence/conf

However, you need to shutdown Confluence first and then edit the server.xml file.

# sh /opt/atlassian/confluence/bin/shutdown.sh

# nano server.xml

Now, find the ‘localhost’ value and replace it with your server IP address.

Save and exit the file. Next step is to configure a MySQL datasource connection for Confluence. In order to do that, you need to install the MySQL JDBC driver. Below is the procedure to do that. Execute the below commands:

# cd /opt
# wget http://dev.mysql.com/get/Downloads/Connector-J/mysql-connector-java-5.1.35.tar.gz
# tar -zxvf mysql-connector-java-5.1.35.tar.gz
# cd /opt/mysql-connector-java-5.1.35
# mv mysql-connector-java-5.1.35-bin.jar /opt/atlassian/confluence/confluence/WEB-INF/lib/

With these commands you are downloading the JDBC driver in the /opt directory, extracting it and then move the unpacked jar file in the appropriate Confluence directory (/opt/atlassian/confluence/confluence/WEB-INF/lib/).

Next, edit the server.xml file again:

# nano /opt/atlassian/confluence/conf/server.xml

Find the following lines:

<Context path="" docBase="../confluence" debug="0" reloadable="true">
   <!-- Logger is deprecated in Tomcat 5.5. Logging configuration for Confluence is specified in confluence/WEB-INF/classes/log4j.properties -->

Insert the underneath lines within the Context element (between the ‘<Context path=”” docBase=”” ‘ and ‘<!– Logger is deprecated in Tomcat 5.5.” ‘ line):

<Resource name="jdbc/confluence" auth="Container" type="javax.sql.DataSource"
          username="confluenceuser"
          password="your_password"
          driverClassName="com.mysql.jdbc.Driver"
          url="jdbc:mysql://localhost:3306/confluence?useUnicode=true&amp;characterEncoding=utf8"
          maxActive="15"
          maxIdle="7"
          defaultTransactionIsolation="READ_COMMITTED"
          validationQuery="Select 1" />

Of course replace your_password with the password you configured during the creation of the confluence database. Save and close the file. Now edit the web.xml file located in the WEB-INFdirectory:

# nano /opt/atlassian/confluence/confluence/WEB-INF/web.xml

Insert the following components just before </web-app> near the end of the file:

<resource-ref>
    <description>Connection Pool</description>
    <res-ref-name>jdbc/confluence</res-ref-name>
    <res-type>javax.sql.DataSource</res-type>
   <res-auth>Container</res-auth>
</resource-ref>

Save and close the web.xml file.

After all these changes you’ve made to the configuration files, you can now start Confluence. Issue this command:

# sh /opt/atlassian/confluence/bin/start-confluence.sh

For troubleshooting use the Confluence log file (/opt/atlassian/confluence/logs/catalina.out).

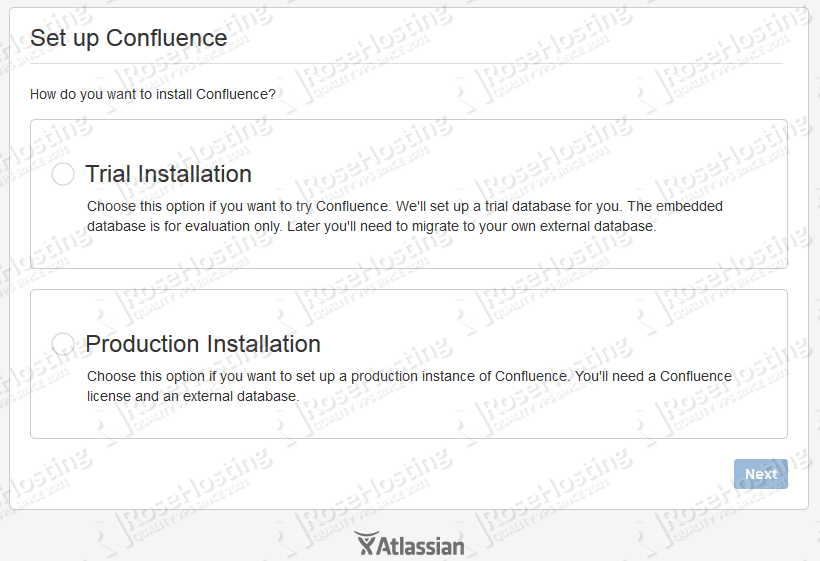
You can now finish the Confluence installation at: http://your_server_IP:8090 . You will be welcomed by the installation page as shown in the picture below:
confluence

Click on Production Installation (you can choose a Trial Installation of course, since the Product install requires you to have an active Confluence license), choose if you want to have an addon and enter your license key in the following screen.

Then, set up the database. Choose MySQL and Direct JDBC Connection. Enter the corresponding settings:

Driver Class Name: com.mysql.jdbc.Driver

Database URL: jdbc:mysql://localhost:3306/confluence?useUnicode=true&characterEncoding=utf8

Username: confluenceuser

Password: your_password

Then click on Next and finish the Confluence configuration.

Congratulations, if you followed our steps carefully you now have a fully working Confluence installation on your CentOS 7 VPS. For more information about Confluence, visit their official documentation.

Using A Custom Domain Name with Confluence

To use a custom domain with Confluence, simply configure an A Record at your domain provider, or wherever DNS for your domain is hosted. The A record should look like this:

documentation A 101.102.103.104

Replace the IP above with the address of your Confluence server. This will point http://documentation.domain.com to your Confluence server.

Posted in Guides & How To's, Linux VPS, VPS Hosting | Leave a comment

New Expanded Chicago VPS Capacity

We are pleased to announce our most recent expansion, adding new capacity in Chicago for VPS hosting, cloud web hosting, and dedicated server hosting. Our Chicago location is hosted within the Equinix CH3 data center, just minutes outside of downtown Chicago.

The new location allows us to deploy new services instantly in the Central US Region, as we also do in New York, London, and Los Angeles.

Our VPS hosting platform is designed to provide the power of dedicated hosting, without the high cost. Each secure, isolated VPS is equipped with the latest high-performance Xeon CPUs, solid-state (SSD) storage, and server-grade memory, provisioned on-demand to meet your specification.

  • 1Gbps (1000Mbit) Internet connectivity
  • Private/Reserved Memory and Storage
  • Read/Write Speed up to 1.2 GB/s (1200 MB/s)
  • IOPS up to 5,000 per Instance (IO/s)
  • Linux and Windows

The Chicago datacenter is our fourth hosting location to open. Due to equal proximity to all regions of North America, Chicago is an ideal location for USA VPS hosting, remote desktop (RDP) hosting, Chicago dedicated server hosting, and cloud web hosting.

More about the Chicago data center and Chicago VPS hosting: Chicago VPS Hosting

See also:

Posted in Announcements, Company News, VPS Hosting | Leave a comment

Run “yum update” with a specific repo (CentOS/RHEL Linux)

To tell yum to check only a specific repository for updates, append the yum command like below:

yum --disablerepo="*" --enablerepo="my-repo" update

The –disablerepo=”*” disables all repositories, and then –enablerepo=”my-repo” enabled only my-repo. Note that the repository you enable must already be configured in the system, or this command will not work.

First, you may want to check which repositories are currently active in the system. Confirm that the repository you want to update from is enabled. To get a list of all repositories currently active, run:

yum repolist

The same command line options can be used with yum install and other operations, for example

yum --disablerepo="*" --enablerepo="my-repo" install httpd

This article applies to:

  • CentOS Linux
  • Fedora Linux
  • RHEL
Posted in Linux VPS, Tech Support, VPS Hosting | 1 Response

Installing SQL Server Management Tools & SSMS on Window Server/VPS

SQL Server Management Studio (SSMS) is part of SQL Server Management Tools provided by Microsoft for administrators and developers to interface with Microsoft SQL Server. Management Studio is used to connect to a database and directly manage its layout, settings, database objects, and much more.

Read on to see how to install SQL Server Management Studio on a Windows Server or Windows VPS.

(Need help deploying SQL ServerWe provide a full range of Windows Server and Microsoft SQL Server based solutions!

Install SQL Server Management Studio (SSMS)

Depending on your deployment, you may also want to install SQL Server Management Studio. SSMS is used to access local and remote SQL Server databases for administration and development. If you do not already have Management Studio installed elsewhere, you should install it on your Windows Server or VPS alongside SQL Server Express. Follow the steps below to install SQL Server Management Tools.

SQL Server Management Tools are provided free by Microsoft for all editions of SQL Server.

Visit the Microsoft page to download: https://docs.microsoft.com/en-us/sql/ssms/download-sql-server-management-studio-ssms

Download the installer to the Windows server or VPS, then simply run the installer.

Click Install to start the installation. SSMS will download and install the latest version for your system automatically.

Screen Shot 2017-08-08 at 3.09.32 PM

When the installation is complete, the system will require a Restart to finish the installation.

Screen Shot 2017-08-08 at 3.30.29 PM

Posted in Guides & How To's, Tech Support, VPS Hosting, Windows Server, Windows VPS | Leave a comment


Questions? We're here to help.