Blog

Cloud Backup: Setup Guide for VPS and Dedicated Servers

In this guide we will quickly setup Cloud Backup for a VM or dedicated server.

Order Cloud Backup

Select a backup plan from: https://www.solvps.com/cloud-backup/

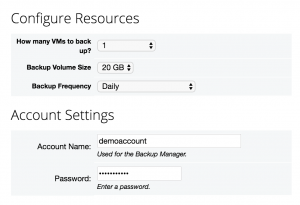
The order process requires a few options to be configured:

Screen Shot 2016-06-27 at 7.39.38 PM

  • How many VMs to back up: Choose the number of VPS to provide a Cloud Backup backup license for. You can manage multiple VMs and servers in the same backup control panel.
  • Backup Volume Size: The total storage space available for your VPS and server backups.
  • Backup Frequency:
    • Daily: Back up the target server each day.
    • Hourly: Back up the target device each hour.
    • Continuous: Back up the target server each minute.

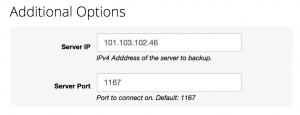
Screen Shot 2016-06-27 at 7.40.01 PM

  • Server IP: The IP address of the target server (or, if backing up multiple servers, the first server). This can be changed later.
  • Port: The port to connect to the target server. Default is 1167. This can be changed later.

Log in to the Control Panel

After ordering Cloud Backup, proceed to the SolVPS Control Panel > Dashboard.

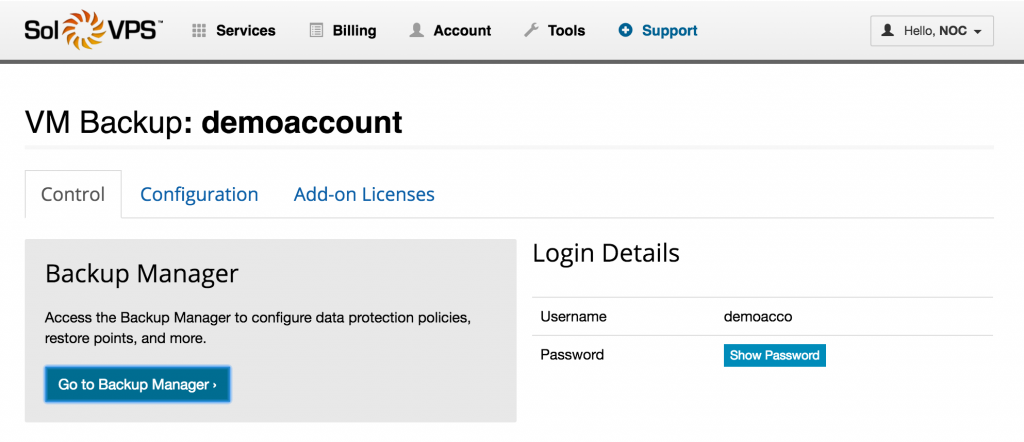
Click Manage Service for the new Cloud Backup/DR service. On this page, you can access the Backup Manager to configure your Servers and Backup Policies, and also modify the configuration of your backup service, including the number of licensed servers, backup volume size, and backup frequency.

Click Go to Backup Manager to setup your server.

Screen Shot 2016-06-27 at 7.53.20 PM

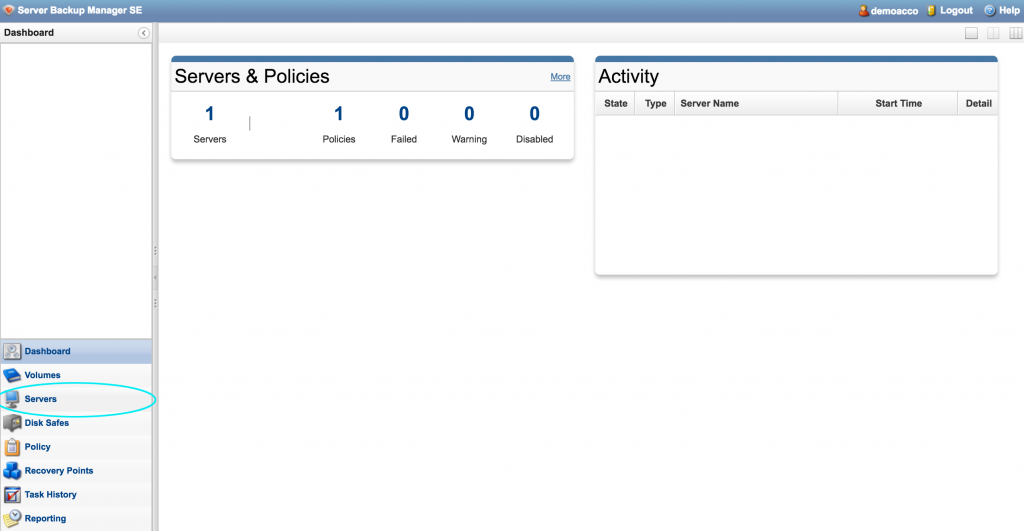
Welcome to the Backup Manager. There is not much to see here, yet. Let’s go to Servers in the bottom-left navigation pane.

Screen Shot 2016-06-27 at 7.54.30 PM

Here you will see your server. However, the backup software must be installed on the server before it can be fully connected to the Backup Manager.

Install the Backup Agent

Install

Download the Backup Agent installer for your server’s operating system:

Run the installer on your server. Simply agree to the EULA and proceed through the installation. When the installation is finished, you may be asked to Reboot the server.

Note: If you need help, contact us to have SolVPS Technical Support install the backup agent for you.

Configure Agent

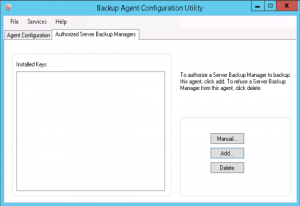
Go to the Start menu and look for Server Backup Agent Configuration Utility. Open the utility and go to the Authorized Server Backup Managers tab.

Screen Shot 2016-06-27 at 10.06.20 PM

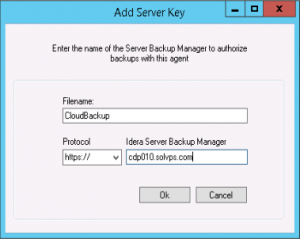
Enter the SolVPS Backup Manager Server details and click OK.

  • File Name: CloudBackup
  • Address: https://cdp010.solvps.com

Screen Shot 2016-06-27 at 10.06.48 PM

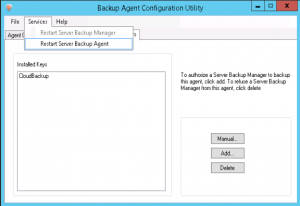
Click Restart Server Backup Agent in the Services menu of the application.

Screen Shot 2016-06-27 at 10.14.49 PM

Configure Firewall

Finally, we need to allow the backup traffic through Windows Firewall. We have created a script to automate this process. Download the script below and run it in PowerShell with Right Click > Open in PowerShell. (You must be logged in as Administrator or an Admin user).

Download

Activate Server

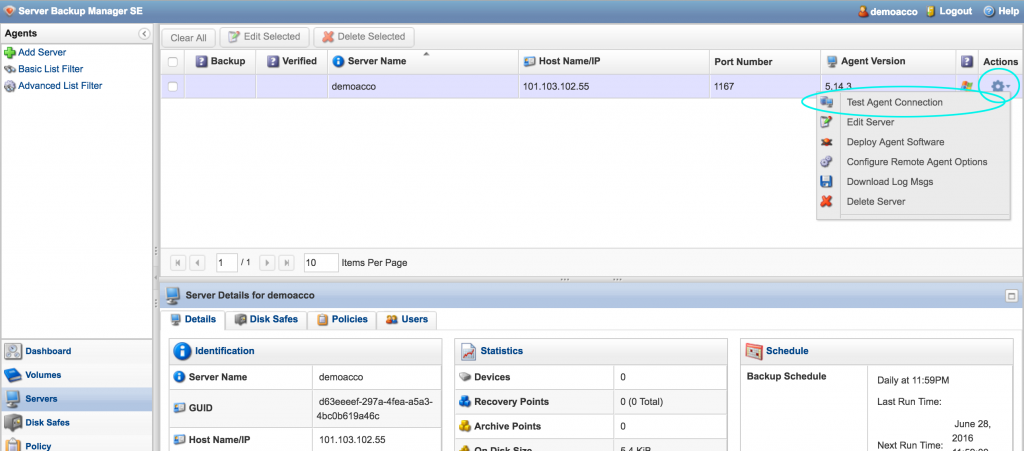
Return to the Servers page of the Backup Manager, and click the Actions icon > Test Agent Connection to authenticate with the VPS or dedicated server.

Screen Shot 2016-06-27 at 11.05.56 PM

At this point, the server is fully activated, and backups will begin to be created on schedule. We can review the backup schedule, configure extra settings, and manage backup checkpoints.

Review Backup Policy

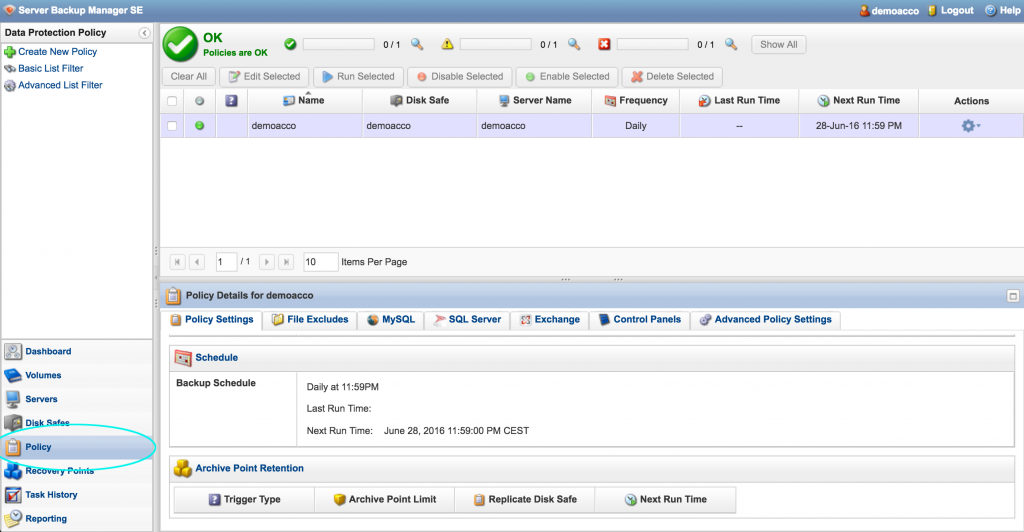
Click Policy in the navigation pane. This page displays an overview of backup plan status. There are several extra features here including the ability to add specific Microsoft SQL, SQL Server, and Exchange Server databases, and for Linux, MySQL databases, which can be backed up on-demand and selectively restored.

Screen Shot 2016-06-27 at 11.11.38 PM

Run a Backup

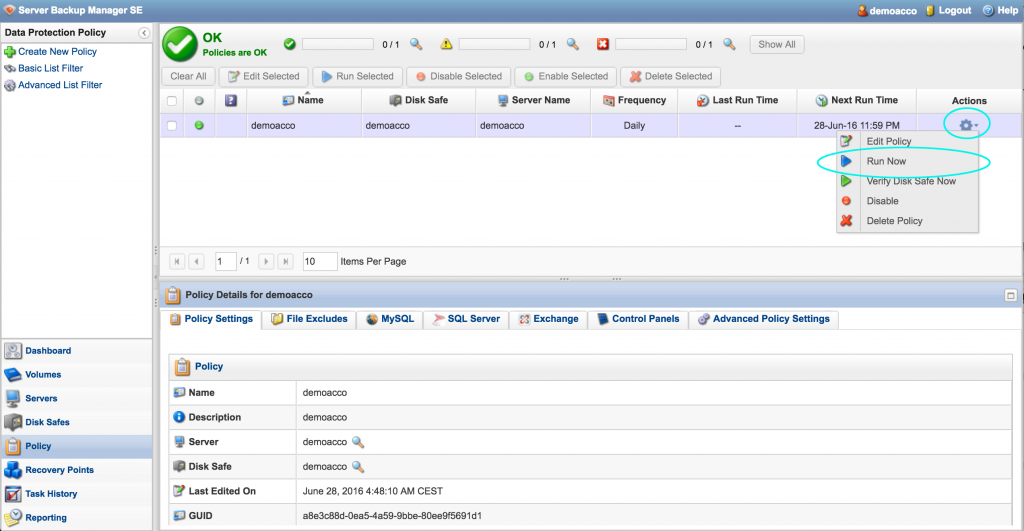
The first backup will take place automatically on schedule, but if you want to start a backup immediately, go to the Policy page and click Actions icon > Run Now.

Screen Shot 2016-06-27 at 11.21.22 PM

Conclusion

The server now has an active backup policy, and (hopefully) a secure backup is already running. This process should be repeated for any additional servers that need to be added to the Backup Manager.

Get Cloud Backup/DR for your VPS or dedicated server now: Cloud Backup by SolVPS

Posted in Cloud Backup, Linux VPS, VPS Hosting, Windows VPS | Tagged , , | Leave a comment

Web Hosting: Quick Setup Guide

Sign Up and Choose a Domain

Select a web hosting plan from: https://www.solvps.com/web-hosting/

Log in to Control Panel

You will receive an email confirmation called New Account Information containing FTP server info, and other info you might need to get started.

You can also proceed directly to the SolVPS Control Panel, where you can manage your web hosting account, find the info mentioned above, and directly log in to your web hosting services.

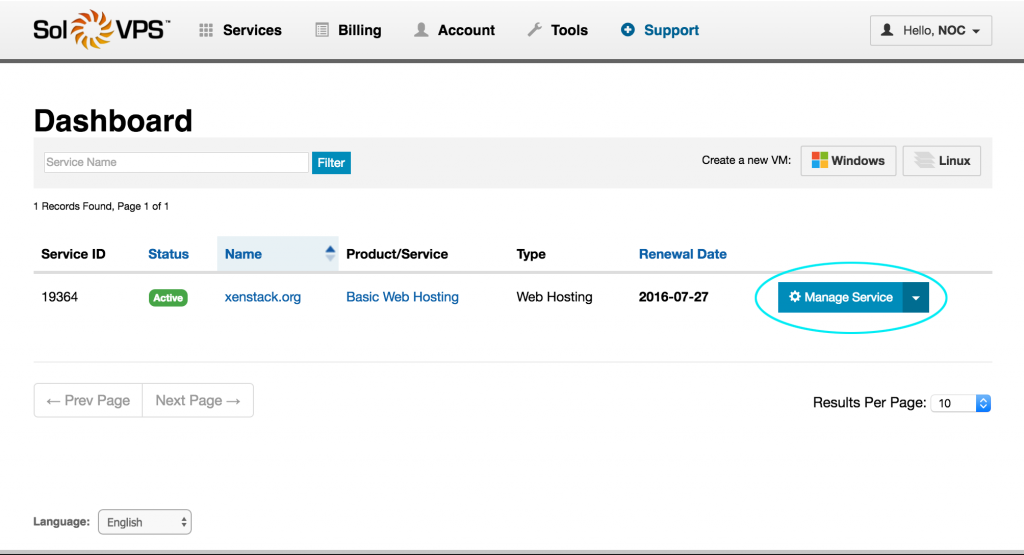
Click Services > Dashboard in the SolVPS menu (if not logged in, log in here). On the Dashboard, select your web hosting service by clicking Manage Service.

Screen Shot 2016-06-27 at 4.26.15 PM

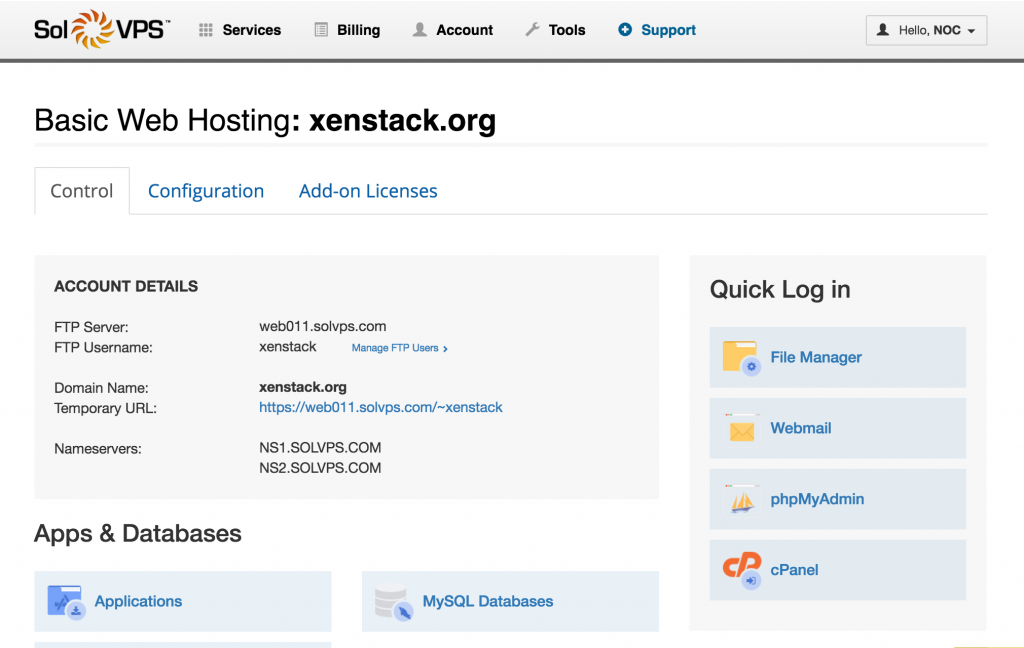
This is your web hosting account dashboard. From this page you can manage all of the features of your account. Right away you will see the FTP server access details, and quick links to key places like Webmail and File Manager.

Screen Shot 2016-06-27 at 5.57.53 PM

Upload Website with FTP or File Manager

We provide two ways to upload files to your hosting account.

Upload Files via File Manager

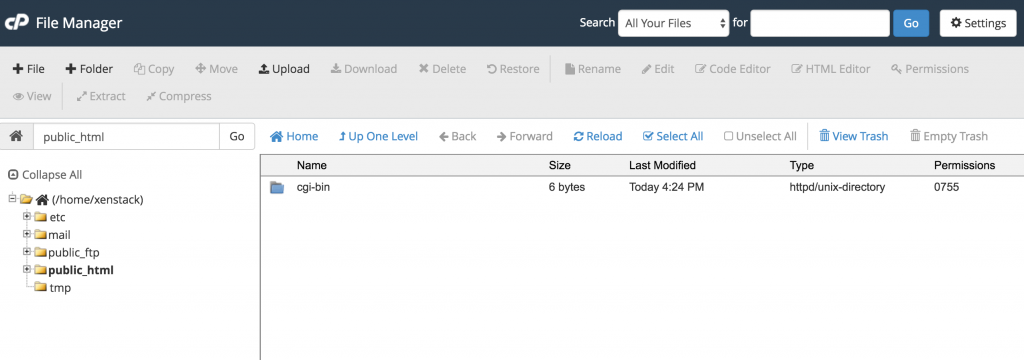
In the control panel, click the File Manager quick link. You will be directed to a web file browser where you can directly manage the files hosted on your account.

Screen Shot 2016-06-27 at 4.33.56 PM

The File Manager will load inside the public_html folder by default. This folder is the default web-accessible folder, and you should put your public website files here. Use the +Upload button to upload your files.

To create a simple web page on your account, add a page called index.html or index.php to this folder.

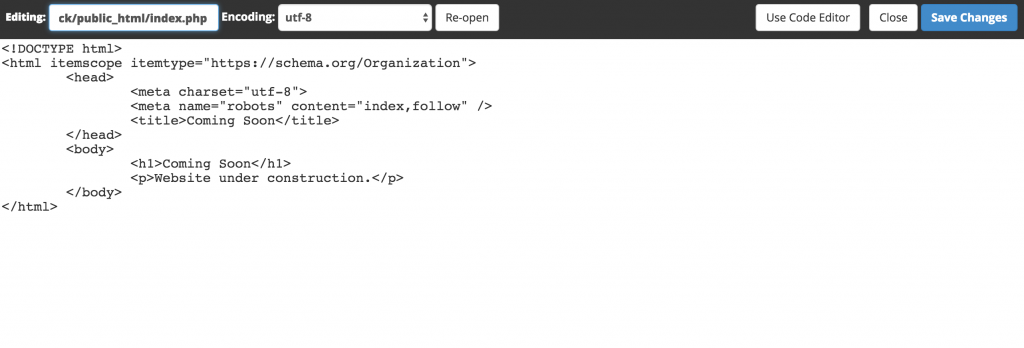
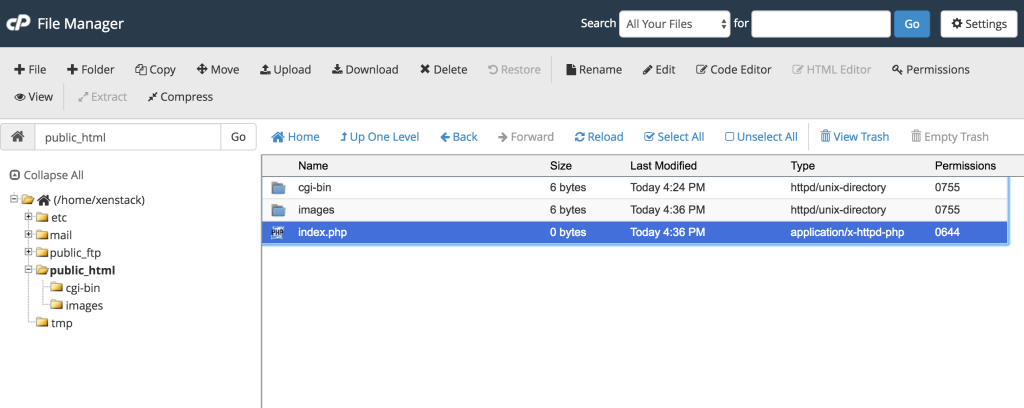
The File Manager supports editing files directly in the web interface. Use the +File and +Folder buttons to create new files. Let’s create a basic index file.

Screen Shot 2016-06-27 at 4.40.04 PM

Screen Shot 2016-06-27 at 4.40.20 PM

Click Save, then return to the SolVPS Control Panel and click the Temporary URL, or open a new tab and go to your domain name. You should see the index page you created in the File Manager.

Upload Files via FTP

You can also use any FTP client to connect to your hosting account and manage files. Some of the best FTP clients (and download links) are:

Most FTP clients are very straightforward and easy to use: simply enter the FTP Server, username, and password to connect. The server name and login credentials for your account are provided in the SolVPS Control Panel, and in the New Account Information email.

Update Domain Name Servers (DNS)

Registering a new domain with your hosting account will set up the nameservers automatically. However, if you chose to use an existing domain with the new hosting account, you need to update the domain’s nameservers. This is done at the domain registrar’s website (the company where you bought the domain).

Update the domain’s name servers to:

  • NS1.SOLVPS.COM
  • NS2.SOLVPS.COM

After this update has been completed, your domain will point to SolVPS and connect to your account hosted with us.

Note: It can take up to 6-12 hours for DNS changes to propagate around the world, so you may not see the changes take effect immediately.

Check Backups

We provide continuous, 15-minute backup checkpoints for all web hosting accounts. This is extremely useful because it allows you to:

  • Restore files that were accidentally lost;
  • Roll back changes that were made to a file with no backup;
  • Download up-to-date backups of your entire site.

It’s good to get familiar with the backups interface, in the event that you need to quickly restore a file.

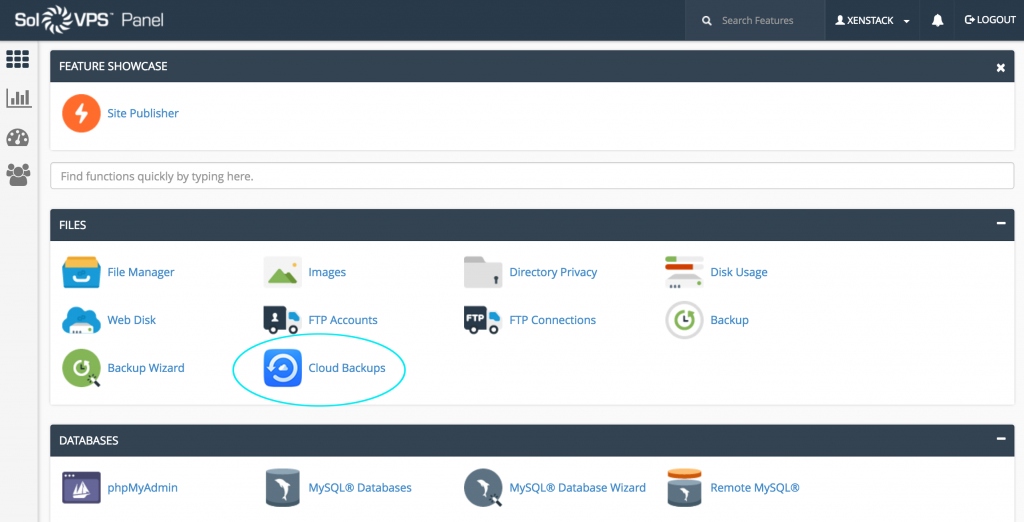
In the SolVPS Control Panel, click cPanel in the Quick Log in menu. Then look for the Cloud Backups link.

Screen Shot 2016-06-27 at 5.27.01 PM

Here you will see a list of backup checkpoints going back in time. Select the checkpoint to browse.

Screen Shot 2016-06-27 at 5.39.51 PM

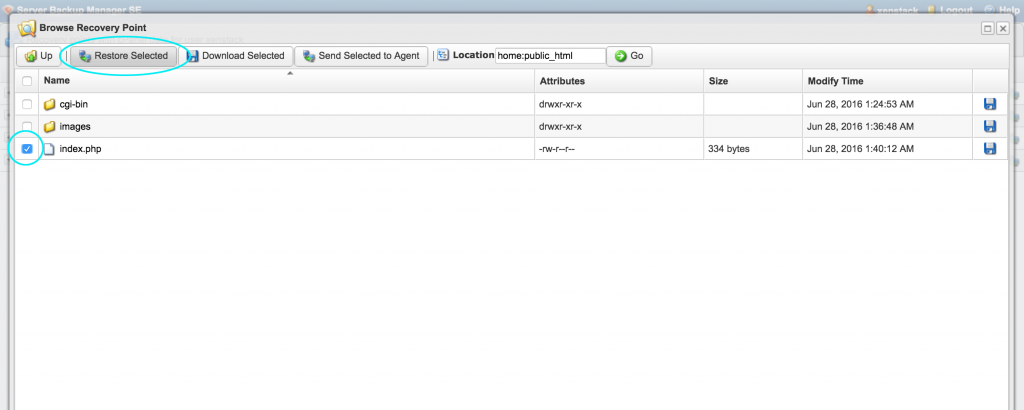
If you navigate to the /username/public_html/ folder, you will see the files backed up from your account. In this example we see the index.php page that we created earlier.

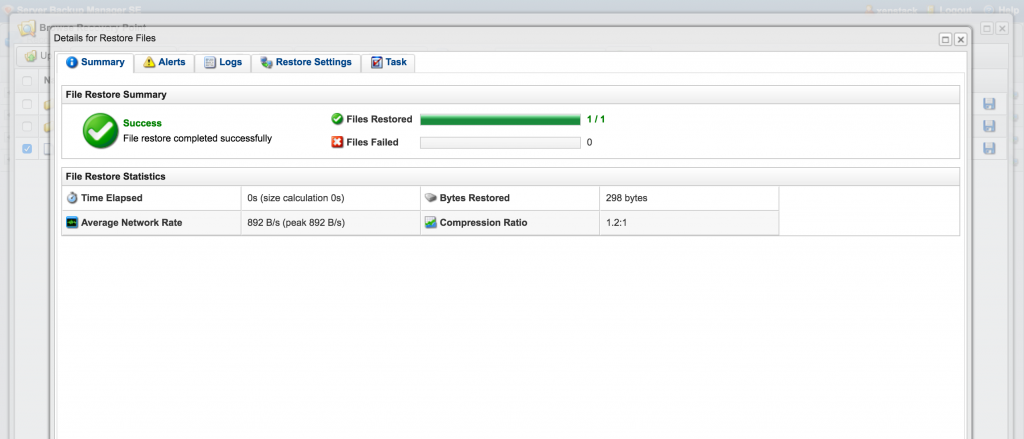
To restore this file to the version in the backup, simply select the file and click Restore.

Screen Shot 2016-06-27 at 5.40.40 PM


Screen Shot 2016-06-27 at 5.41.01 PM

Other Features

Use the SolVPS Control Panel and the cPanel link in the Quick Log in menu to explore all the features available in your account.

Enjoy!

Posted in cPanel/WHM, Featured Guides, Guides & How To's, Tech Support, VPS Hosting, Web Hosting | Tagged , , , , | 2 Responses

Maximum VM Resources Increased to 64GB RAM, 1TB SSD Storage

Our VM platform now supports deployment of VMs with configurations as large as:

  • 64 GB of RAM
  • 1 TB of SSD Storage Space
  • 16 CPU Cores

It is our goal to deliver the best virtual infrastructure service possible, and we believe this is an excellent alternative to a dedicated server (bare metal). Resource sizes are readily changeable, like any VM, so the server configuration is much more flexible than a dedicated server. Consider a case where an application may need to change its environment from a modest 4GB RAM, to 12GB, 32GB, then back again, all within a single month. This kind of fluidity is possible with semi-dedicated VPS hosting.

Learn more about our Windows VPS and Linux VPS hosting solutions, available in each of our data centers New York City, London, and also in Los Angeles.

Posted in About SolVPS, Announcements, Company News | Tagged , , , , | Leave a comment

VPS Hosting Now Available in downtown Los Angeles, California

We are excited to announce a new location for our hosting service: Los Angeles, California. With our choice of a third location, we hope to deliver improved connectivity to users in the western United States, Asia, and Pacific regions. The datacenter facility we have chosen is located directly in downtown Los Angeles at 800 S Hope Street, adjacent to the single largest Internet exchange point in the United States (Any2 CoreSite Los Angeles, at the Wilshire One building).

All of our services have been extended to Los Angeles and are now available for deployment in the new datacenter, including high-performance web hosting, VM hosting, and dedicated server hosting.

Now available in Los Angeles:

For more information about our new Los Angeles location, please visit our Los Angeles VPS Hosting page.

Posted in Announcements, Company News | Tagged , , , , | Leave a comment

SMTP Relay (Smart Host) Now Available for SolVPS Clients

We provide a central SMTP server, also called a mail Smart Host, to relay e-mail outoing from our network. If your software supports configuration of a SMTP host, you may send mail through our relay. The main benefits of using an enterprise relay are security and guaranteed delivery of your e-mail messages. 

For more information about connecting your server or application to the smart host, please visit our Knowledge Base article here.

This service is free and available to all SolVPS clients.  The following features are provided by the SMTP host:

  • SMTP SSL
  • Mail Authentication (DKIM)
  • High sender reputation, resulting in guaranteed delivery
  • Unlimited message volume

Our Terms of Service and AUP strictly prohibit all forms of SPAM and Unsolicited Commercial Email. 

Posted in Announcements, Tech Support | Tagged , , , , , , | Leave a comment

How to use Web RDP in our Control Panel

Our Secure Client Panel provides a built-in Web Remote Desktop (RDP) feature. Web RDP acts as a remote server console, where you can view the server desktop even if network connectivity is interrupted, or if the server is booting up.

Read on for a walkthrough of the process to connect to your remote Windows server or Windows VPS:

How to use Web RDP

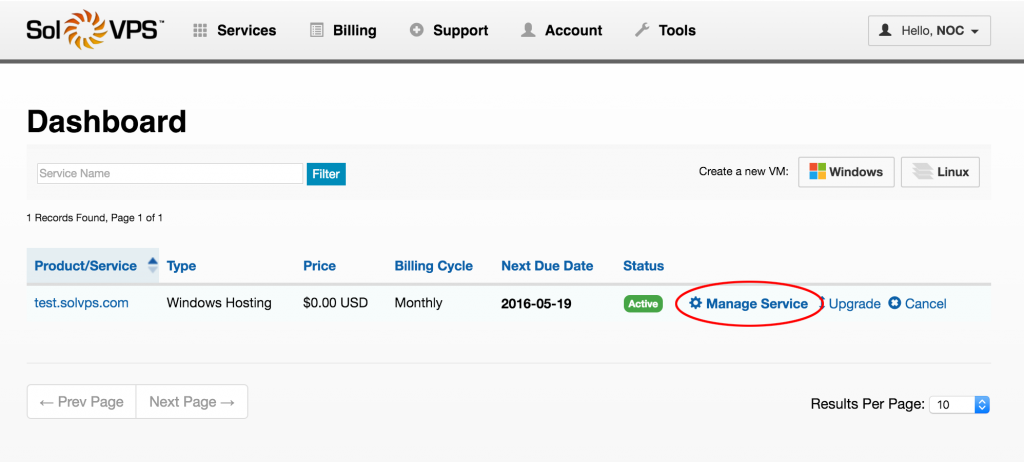
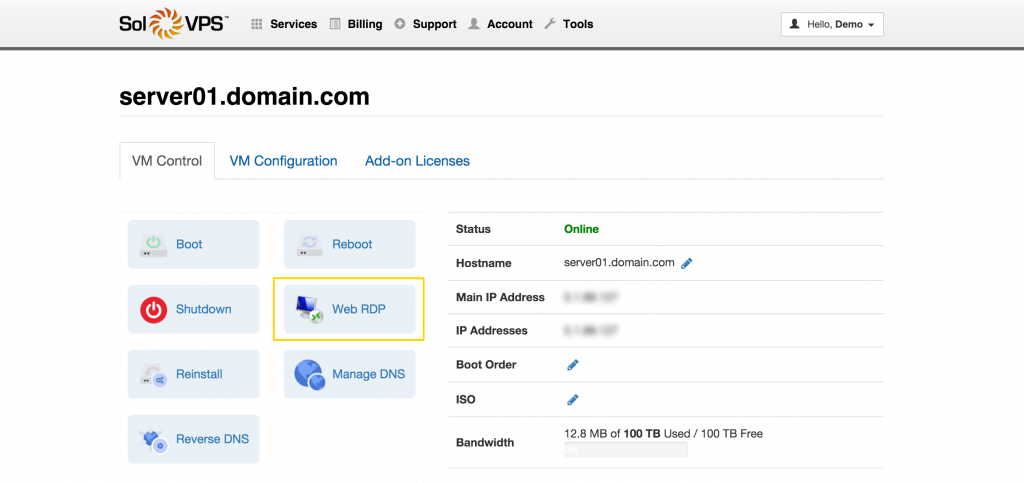
1. Log in to the Secure Client Panel with your SolVPS e-mail address and password. Navigate to Services > Dashboard, where you will see your active hosted services. Click Manage next to the service you want to manage.

web-rdp-1

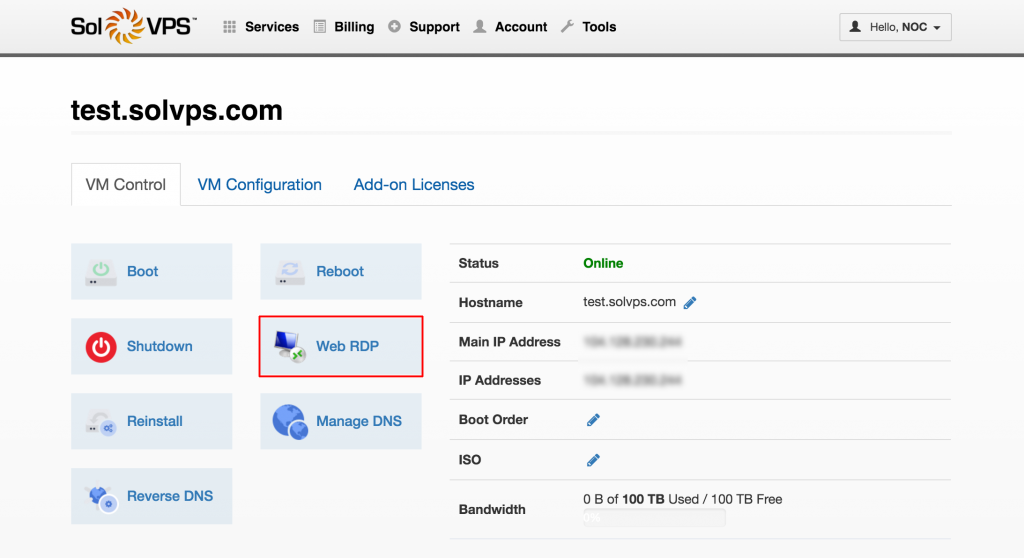
2. Click Web RDP.

web-rdp-2

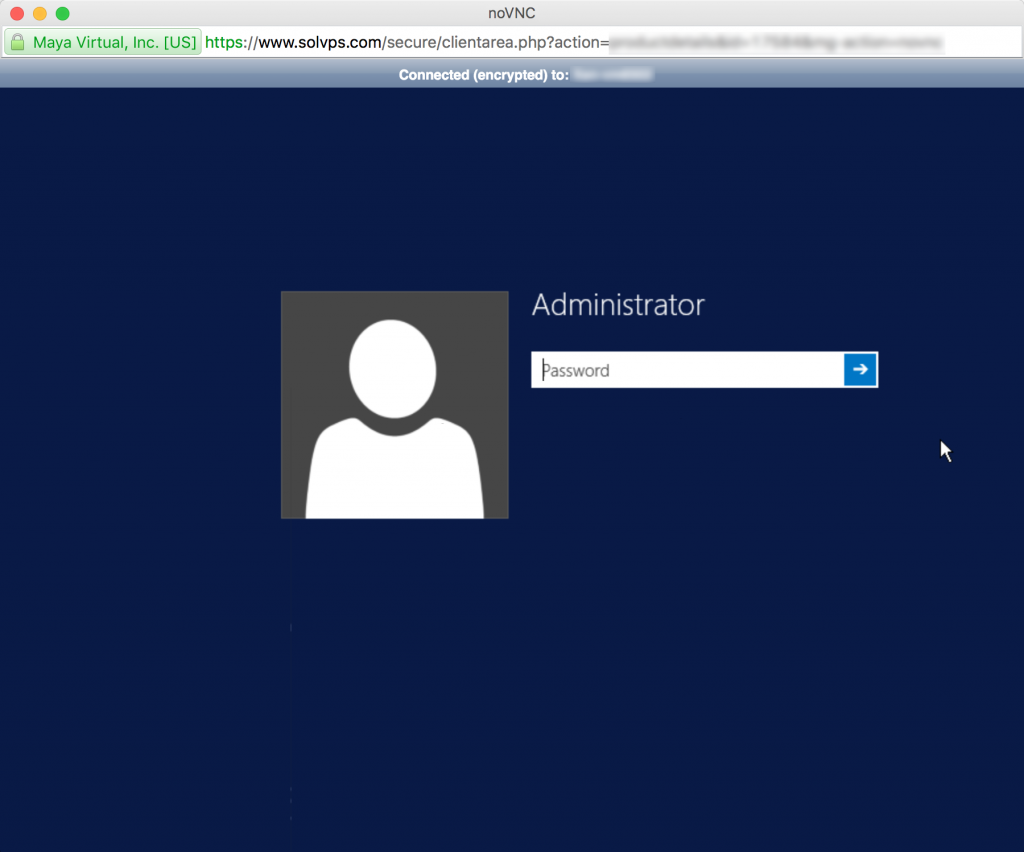
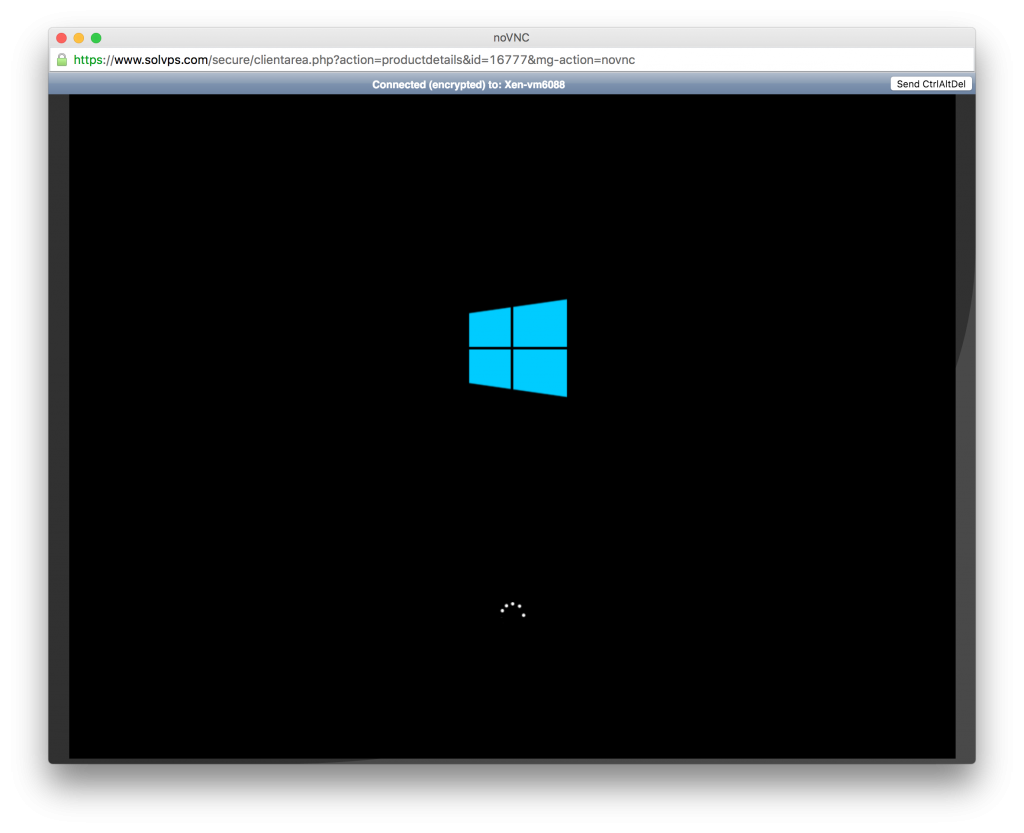
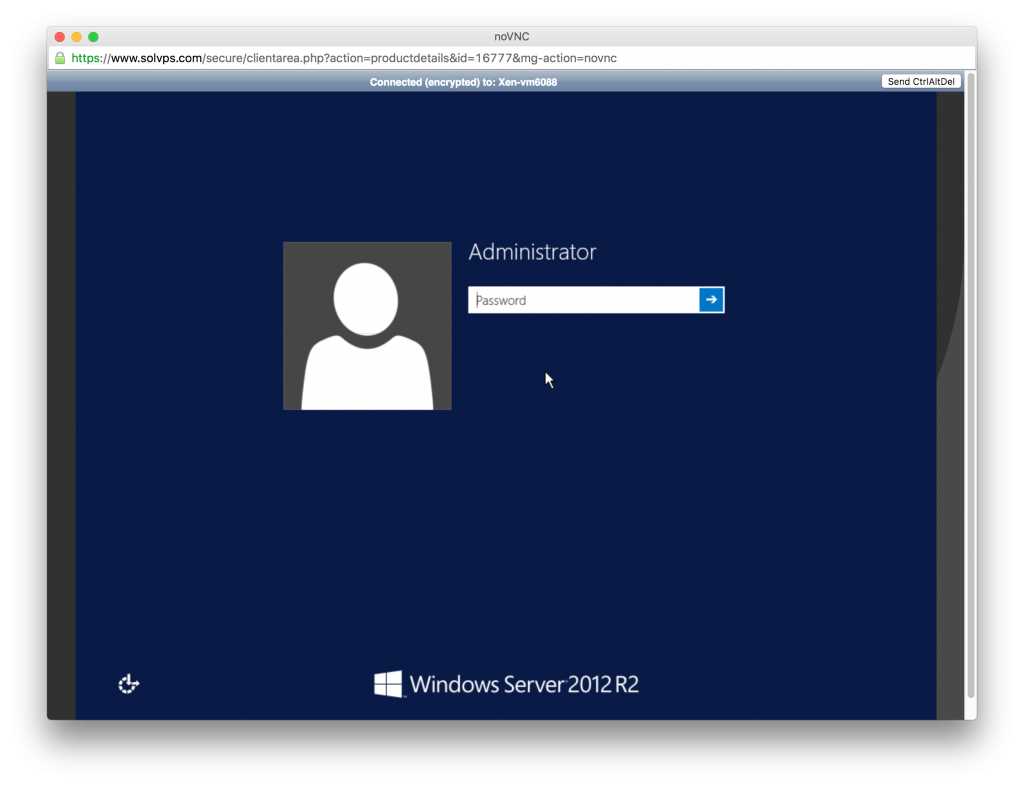
3. This will launch a pop-up window with a HTML5-native VNC session connected to the console of your Windows server. If your server is online, you should see the user log on screen. Enter your Windows user credentials to log in and administer your server.

web-rdp-3

If you experience any trouble with this process, or would like assistance connecting to a Windows server or Windows VPS, please contact our Technical Support team.

Posted in About SolVPS, Guides & How To's, Tech Support, VPS Hosting, Windows Server, Windows VPS | Tagged , , , , , | Leave a comment

How to use RDP (Remote Desktop) on Windows 10

If you are using Windows 10, the best way to connect to a Windows server is Microsoft Remote Desktop Connection, also called RDC.

Read on for a walkthrough of the process to connect to your remote Windows server or Windows VPS:

How to Connect

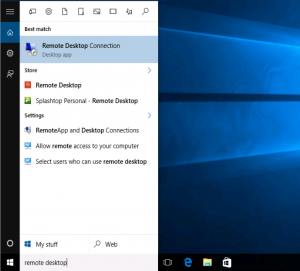
1. Open the Start menu and search for “remote desktop”. You should see Remote Desktop Connection. Open the program.

Screen Shot 2016-04-19 at 7.23.05 PM

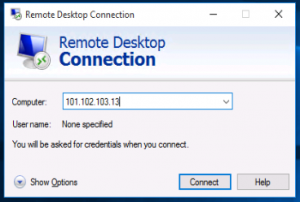
2. In the “Computer” field, enter your server’s public IP address. This address can be found by selecting your service from the Dashboard in the Secure Client Panel.

Screen Shot 2016-04-19 at 7.23.47 PM

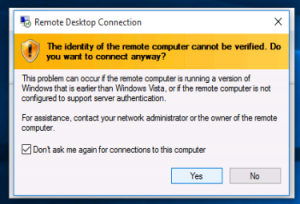
RDC may warn you about the identity of the remote computer, because the remote server uses a self-generated SSL certificate. This is OK.

Screen Shot 2016-04-19 at 7.26.44 PM

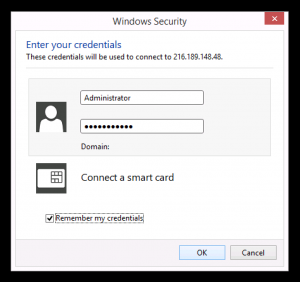
3. RDC will prompt you for the remote system’s username and password. If the server is offline or inaccessible, you will receive an error message.

You can find the username and password in the Secure Client Panel by selecting your Windows VM from the Dashboard.

Screen Shot 2015-05-27 at 2.34.02 PM

Select “Remember my credentials” for faster sign-ins in the future.

That’s it! After clicking “OK”, RDC will connect to your remote Windows VPS or Windows server, and display the remote desktop. You can now interact with the remote desktop exactly like a local Windows PC.

If you experience any trouble with this process, or would like assistance connecting to a Windows server or Windows VPS, please contact our Technical Support team.

Posted in About SolVPS, Featured Guides, Guides & How To's, Tech Support, Windows Server, Windows VPS | Tagged , , , , | 1 Response

NEW FEATURES: Web RDP and Instant Upgrades

We released two major updates today, in addition to a number of small enhancements. The focus of these upgrades was to improve the quality and efficiency of features in the Secure Client Panel.

Instant, Fully Automatic Upgrades

Upgrades are now fully automatic. New upgrade and downgrade orders are processed instantly after the order is submitted. Just reboot to apply the changes in RAM, SSD storage, or CPU configuration. (Note that you must use the Reboot button in the control panel to reboot the VM, rather than issuing a restart from inside the VM.)

To upgrade or downgrade a VPS instance:

  • Navigate to the Dashboard and select Upgrade next to the service you wish to modify.
  • Configure the new resources as needed: RAM, SSD disk storage, CPU cores.
  • Submit the change and complete payment for the upgrade, if required.
  • Return to Dashboard > Manage Service, and Reboot the instance.

That’s it! We hope that on-demand upgrading will be a benefit to management of your services.

HTML5 Web RDP

We have exciting news: the Java-VNC console is dead! The Secure Client Panel now features seamless, 100% HTML5 Web RDP. The Web RDP viewer allows you to view and interact with your Windows server’s remote desktop in a secure SSL-encrypted browser window.

The new Web RDP viewer is compatible with almost all browsers on all devices, with no need for extra plugins or configuration. Here’s a preview of the Web RDP viewer in action:

web-rdp-panel

Screen Shot 2016-03-24 at 8.11.41 PMScreen Shot 2016-03-24 at 8.08.27 PM

Updates

In addition, we have implemented some small changes to the panel UI to improve efficiency.

A good start to 2016, and we have more new features upcoming. Thanks for reading!

Posted in Announcements, VPS Hosting | Tagged , , , , | Leave a comment

What are SSD storage and RAID10? Why are they important for hosting?

SSD (Solid-State Drive) Storage: File storage based on SSDs, rather than HDD (Hard Disk Drives). Solid-state storage is a newer technology that supersedes disk-based storage in performance, delivering read/write speeds often many times greater than disk-based storage speeds. 

RAID refers to a technology used to combine multiple SSDs or HDDs in a synchronized array. The result is fault tolerance, and even greater performance capacity, as several SSD units are committed to sharing the same input/output operations. 

SolVPS employs RAID10 technology in all of its storage arrays. RAID10, or RAID1+0, arrays SSDs by dividing 16 drives into 2 groups, with each group of 8 being a mirror of the other. The resulting arrayed storage I/O allows for the best possible storage speed and redundancy. 

Although the details of solid-state storage and RAID technology are more in-depth, this article provides a good summary of the definitions and reasons why they are important to SolVPS. We encourage you to learn more about each of them! 

Posted in About SolVPS, Guides & How To's, Tech Support | Tagged , , , , | Leave a comment

cPanel: How to Backup or Dump MySQL Databases via SSH

This article applies to Linux servers and VPS instances running cPanel/WHM. If you need to back up, dump, or restore a database via command line (SSH) on your cPanel server, read on.

Restore a MySQL Database

To restore an existing .sql backup of a MySQL database, run the following mysql command as root or a user with elevated privileges.

mysql db_name < db_name.sql

You should replace “db_name” with the name of the database you want to restore into, for example “wp_myblog”.

In case you have a combined .sql dump of several databases, specify the single database to be restored with the syntax:

mysql --one-database db_name < multidbs.sql

Create a MySQL Database Dump (Backup)

The mysqldump command creates text file exports of MySQL databases. The resulting .sql files can be used to create an image of the database for duplication or restoration at a later time.

To dump a single database, run the command below to dump the database and write the output text to a .sql file:

mysqldump db_name > db_name.sql

You can also export multiple databases to the same .sql dump. In this command “db_name1” and “db_name2” are the names of individual databases to be exported together.

mysqldump --databases db_name1 db_name2 > databases.sql
Posted in cPanel/WHM, Guides & How To's, Linux VPS, Tech Support, VPS Hosting | Tagged , , , , , | Leave a comment


Questions? We're here to help.