Blog

How to Enable Ping on Windows / Windows Server or VPS

Windows comes with ICMP (ping) communications blocked by the system firewall, by default. You may want to enable ping on your Windows VPS or dedicated server for some practical purposes, for example to monitor uptime with an outside ping-monitoring service.

How to Enable Ping (ICMP) on Windows

Simply open Command Prompt as Administrator (right click > Run as Administrator), and run the command below to enable ICMP communication through the system firewall.

netsh firewall set icmpsetting 8

Ping should start communicating with the server immediately. Applies to:

  • Windows Server 2012 R2, 2008 R2, 2003 R2
  • Windows 10, 8, 7, Vista, XP
Posted in Guides & How To's, Tech Support, VPS Hosting, Windows Server, Windows VPS | Tagged , , , | Leave a comment

“Failed to Fetch: 404 Not Found” Errors in Ubuntu apt-get

On recent versions of Ubuntu, you may get the following error when trying to run apt-get update or apt-get install: 

Failed to fetch 404 Not Found

Usually, the reason for this error is changing locations of Ubuntu repositories. According to the versioning policies of Ubuntu, normal releases are supported for 9 months, whereas LTS (Long Term Support) releases are supported for 5 years.  After the support period has expired, the repository is moved to another server and will no longer be available in the standard location.

Solution

The best solution to this issue is to upgrade the Ubuntu version, which will update sources for apt-get as well. To update, run the command:

sudo apt-get dist-upgrade

If you prefer not to update, or cannot update the system for another reason, then it is also possible to update the file /etc/apt/sources.list. To use this solution, you should already be familiar with choosing custom repositories.

Applies to:

Posted in Linux VPS, Tech Support, VPS Hosting | Tagged , , , , | Leave a comment

How to Configure NAT iptables Module on Linux VPS/Server

On many virtual servers, NAT and other iptables modules may not be loaded by default. This module is critical for using types of network address translation like MASQUERADE.

To test whether your Linux VPS or server has the NAT module loaded, run the following command and check for the example output (meaning NAT is not installed).

# iptables -t nat -L
iptables v1.4.7: can't initialize iptables table `nat': Table does not exist (do you need to insmod?)

To solve this, simply run the modprobe command to load the module:

modprobe iptable_nat 

That’s it! NAT and related address translation modules are now active and loaded on your system.

You may receive errors similar to these:

WARNING: Error inserting nf_conntrack_ipv4 (/lib/modules/2.6.32-431.11.2.el6.x86_64/kernel/net/ipv4/netfilter/nf_conntrack_ipv4.ko): Cannot allocate memory
WARNING: Error inserting nf_nat (/lib/modules/2.6.32-431.11.2.el6.x86_64/kernel/net/ipv4/netfilter/nf_nat.ko): Cannot allocate memory
WARNING: Error inserting ip_tables (/lib/modules/2.6.32-431.11.2.el6.x86_64/kernel/net/ipv4/netfilter/ip_tables.ko): Cannot allocate memory
FATAL: Error inserting iptable_nat (/lib/modules/2.6.32-431.11.2.el6.x86_64/kernel/net/ipv4/netfilter/iptable_nat.ko): Cannot allocate memory

In this case, the server’s (or virtual server’s) RAM is insufficient, so you should add some additional memory to the server before trying the modprobe command again.


Posted in Guides & How To's, Linux VPS, Tech Support, VPS Hosting | Tagged , , , , , , | Leave a comment

Installing Memcache on cPanel server or VPS to Improve Page Speeds

Memcache is one of several different caching methods available for Apache/PHP web servers. It is designed to speed up websites and web apps, especially those utilizing databases, by caching frequently-accessed data and objects in RAM for quicker access.

Installing Memcache on a cPanel server or cPanel VPS is a simple, and effective way to begin optimizing your existing website. Follow the steps below to install and activate Memcache and its service daemon, memcached

How to Install Memcache on a cPanel Server or VPS

Log in to your cPanel VPS or cPanel server via SSH as the root user.

Install memcache via yum:

yum install memcached

Start the memcached service on the server:

service memcached start

Next, install memcache for PHP from source, running each command separately:

wget http://pecl.php.net/get/memcache

tar zxvf memcache-3.0.8.tgz
cd memcache-3.0.8
phpize

The result of “phpize” should look like this:

# phpize
Configuring for:
PHP Api Version:         20100412
Zend Module Api No:      20100525
Zend Extension Api No:   220100525

Compile memcache:

./configure
make
make install

Open your server’s php.ini file, and search for “extension=memcache.so”. If it is not present, add the following line to the bottom of the php.ini file:

extension=memcache.so

Restart Apache:

service httpd restart

Make sure memcached will be up even after a server reboot:

# chkconfig --levels 235 memcached on

To confirm whether Memcache is installed and active with the server’s current PHP configuration, run the command like below:

root@server [~]# php -m | grep memcache
memcache

You should see “memcache” returned from the list of active PHP modules. Memcache (memcached) is now installed and running on the server!

Posted in cPanel/WHM, Guides & How To's, Linux VPS | Tagged , , , , , , | Leave a comment

How to Change the Password on a Windows Server or VPS

Follow the steps below to change the password for your Windows server instance. The password you will change is the password of the Administrator user, which is used to access the server with RDP (remote desktop). Changing the password requires access to the server. 

How to Change the Administrator Password

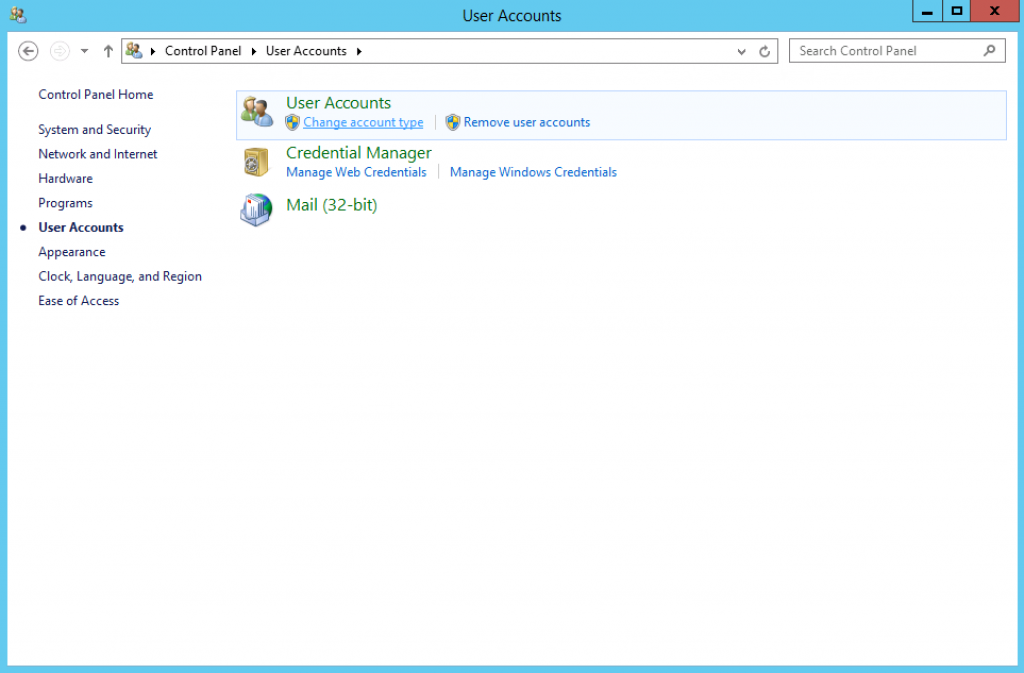
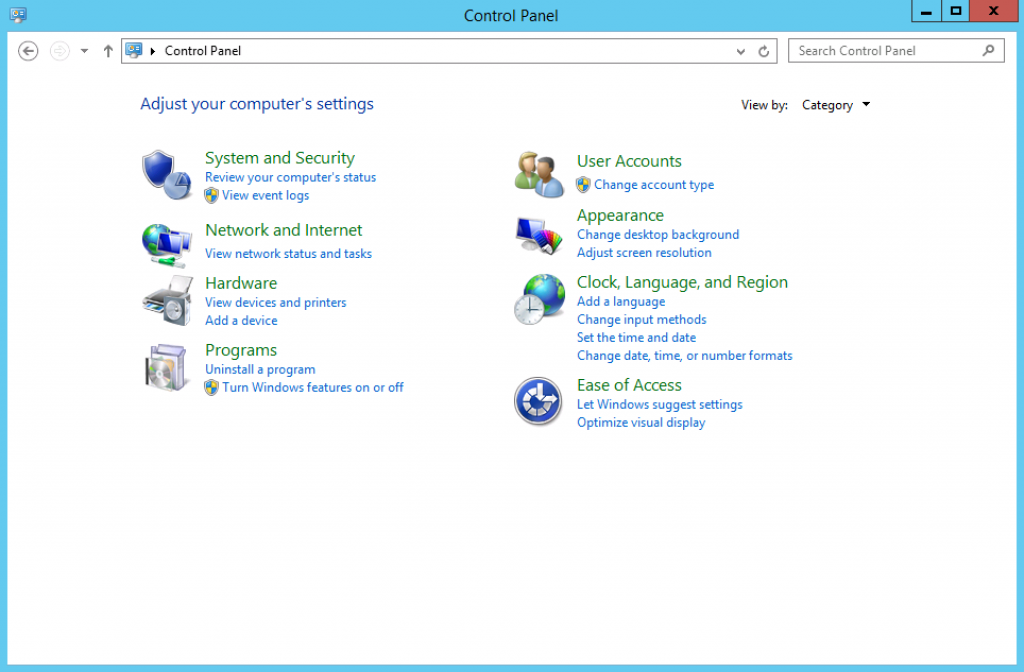
First, log in your Windows Server instance via remote desktop. Open Start > Control Panel:

Screen Shot 2015-11-02 at 3.37.07 PM

Navigate to the User Accounts section. Here, find the link Change account type:

Screen Shot 2015-11-02 at 3.41.04 PM

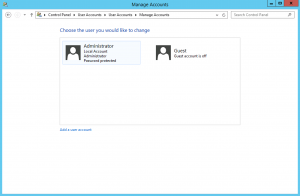
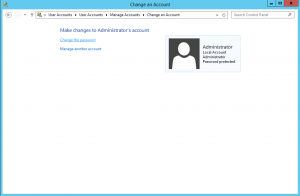
Select your user (Administrator or Admin) and click Change the password:

Screen Shot 2015-11-02 at 3.37.24 PM Screen Shot 2015-11-02 at 3.37.38 PM

Remember to always use a secure password!

This guide applies to:

  • Windows 10
  • Windows Server 2012 R2 / Windows 8
  • Windows Server 2008 R2 / Windows 7 / Windows Vista
  • Windows XP
Posted in Guides & How To's, Security, Windows Server, Windows VPS | Tagged , , , , | Leave a comment

Secure cPanel/WHM Login: Installing a Valid SSL for the Portal, Webmail, and FTP

In this guide, we will show you how to install a valid, commercially-signed SSL certificate on a cPanel/WHM server. This will provide verified security for cPanel services like the cPanel user login portal, WHM admin login portal, Webmail, and FTP.

First, log in to the WHM administrator interface as the root user.

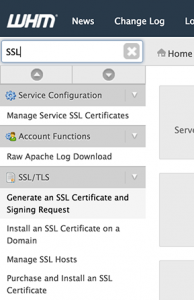
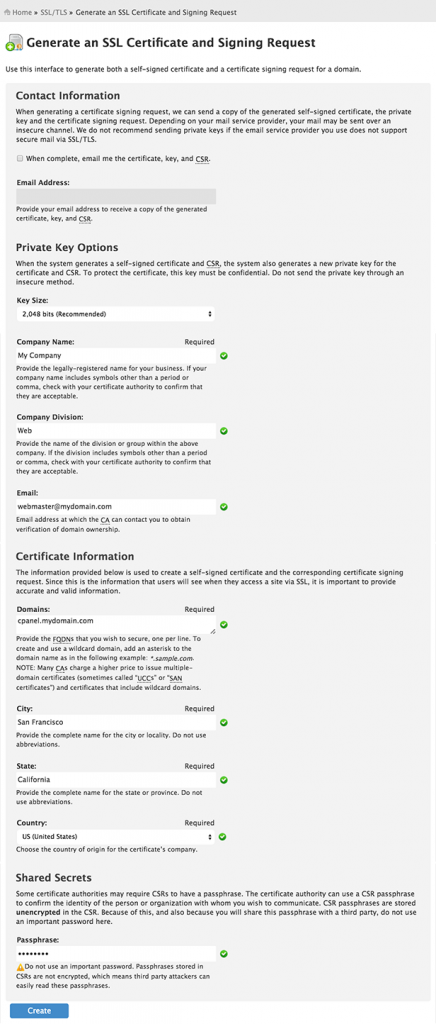
In the left-hand navigation, go to SSL/TLS, then Generate an SSL Certificate and Signing Request.

cpanel-ssl-1

Here you will create a CSR (certificate signing request) to provide to the SSL issuer. Fill in the form like our example, using your own information:

cpanel-ssl-2

Note: The resulting SSL certificate will secure https://cpanel.yourdomain.com. There are two important things to note:

  • There must be a DNS record of type A Record pointing the subdomain “cpanel” to the IP address of the cPanel/WHM server.
  • Alternately, you could secure yourdomain.com and share this SSL certificate with your public website, if both share the same IP address.

Click Create.

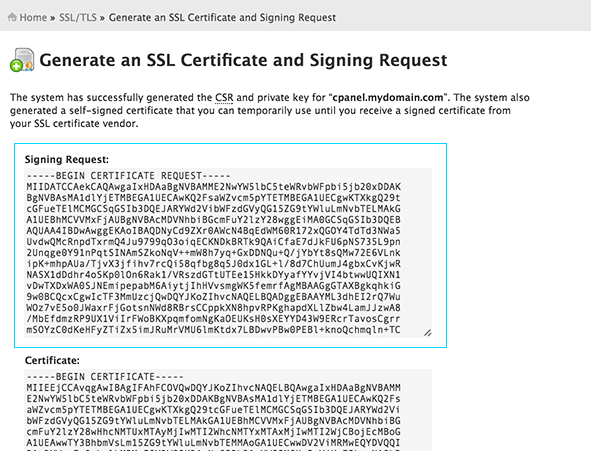
On the next page, copy the contents of the Signing Request box. This certificate request will be required by the company where you purchase the SSL certificate. If you have not purchased a commercial SSL yet, we offer them as low as $9.95 per year.

cpanel-ssl-3

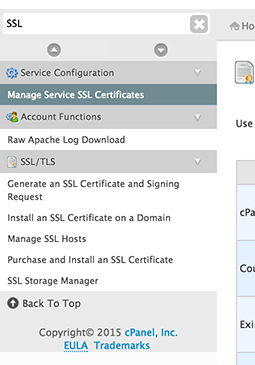
After receiving the issued certificate (.crt file) from the SSL provider, navigate to Service Configuration, then Manage Service SSL Certificates in WHM.

cpanel-ssl-4

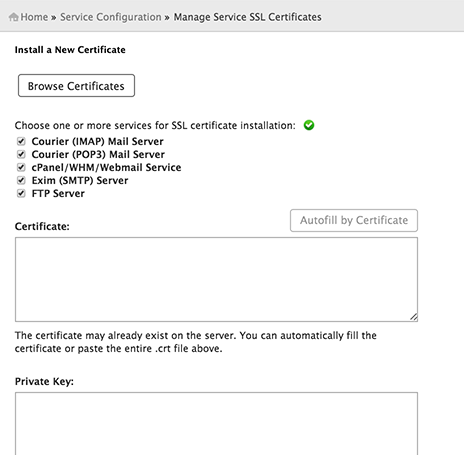
Scroll down to Install a New Certificate. Under “Choose one or more services,” select all of the services.

Scroll down to the box labeled Certificate. Copy in the text contents of the .crt file you received from the SSL provider. Click Autofill by Certificate to auto-populate the remaining fields.

cpanel-ssl-5

Click Install.

Congratulations! cPanel/WHM is now secure and verified.

Posted in cPanel/WHM, Guides & How To's, Linux VPS, Security, Tech Support, VPS Hosting | Tagged , , , , , | Leave a comment

Access the Windows Store on Server 2012 R2 [How To]

Many features of Windows 8 are available in Windows Server 2012 R2. Follow the steps below to enable access to the Windows Store and related programs on a Windows Server 2012 R2 system.

How to Enable Windows Store on Server 2012 R2

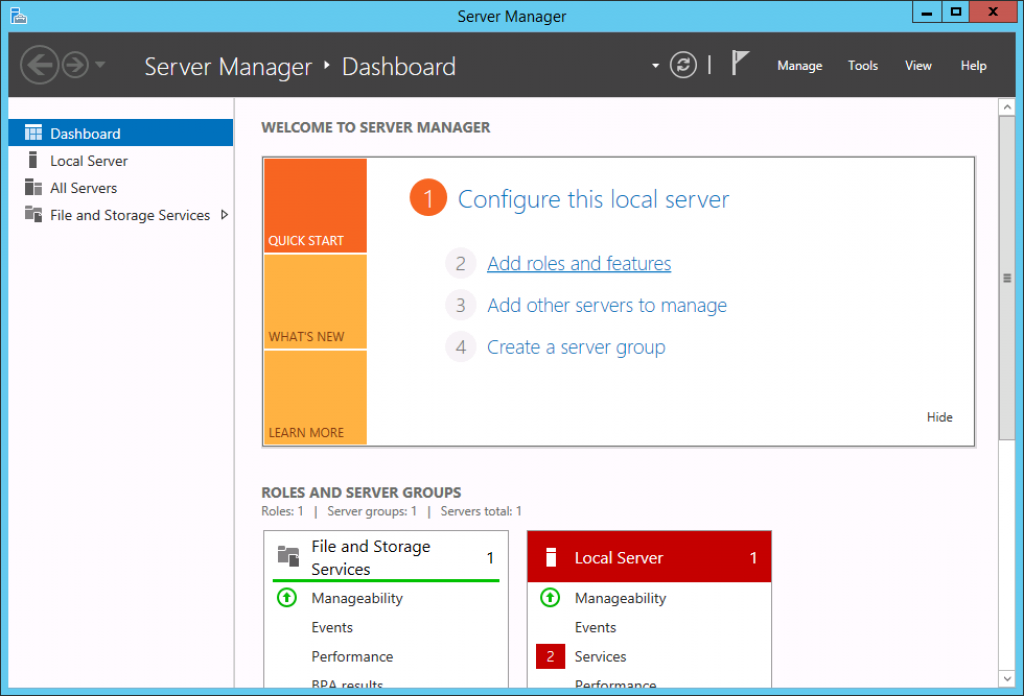
Open Server Manager. Click Add Roles and Features.

Screen Shot 2015-10-13 at 1.04.24 PM

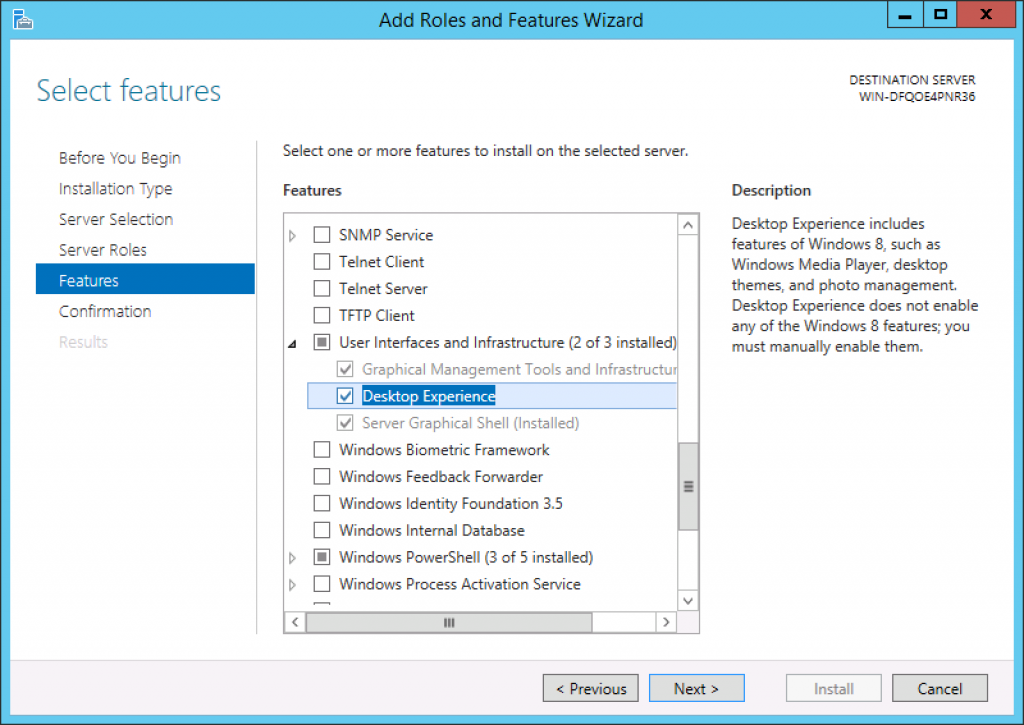
Click Next through the default options until you reach the Features pane. Here, scroll down to User Interfaces and Infrastructure, expand the list, and select Desktop Experience.

Screen Shot 2015-10-13 at 1.06.07 PM

A window will appear asking you to install additional features. Confirm by clicking Add Features. Then, proceed to the installation pane and click Install.

How to Access Windows Store on Server 2012 R2

After successfully installing the Desktop Experience feature and rebooting the server, you can access the Windows Store. However, you must use a non-Administrator account to access the Windows Store.

Go to Control Panel > User Accounts > Add a user account to add a new user. The user can be an administrator if you want (it simply cannot be the user “Administrator”).

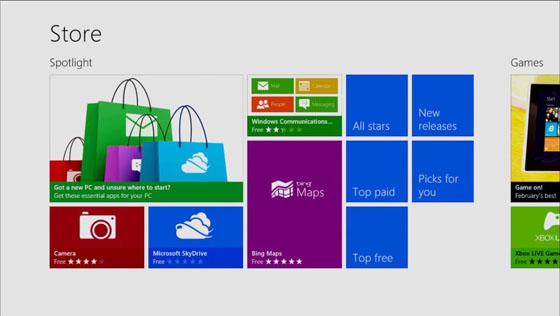
Now, log in to Windows with the new user account. You can find Windows Store in the Start menu and use it as you normally would on a Windows 8 system.

win8_arm_store_0

This guide applies to:

  • Windows Server 2012 R2
Posted in Guides & How To's, VPS Hosting, Windows Server, Windows VPS | Tagged , , , | Leave a comment

Synchronize Time with NTP on Windows Server or VPS [How to]

In this post we will look at a simple way to continuously and accurately synchronize system time on a Windows server. There are many applications that might require accurate timekeeping down to the millisecond, and this is an excellent solution for those situations.

Install NTP with NetTime

First, download and install NetTime from their official website: http://www.timesynctool.com/

NetTime is a Windows program that uses global NTP (Network Time Protocol) servers to synchronize the system clock.

Synchronize System Clock

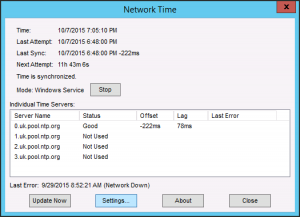
After installing and starting NetTime, you can find the application in the system tray. Double-clicking the NetTime icon will open a summary. After the initial installation, the time may not be synchronized, so you should start the synchronization.

Screen Shot 2015-10-07 at 12.05.02 PM

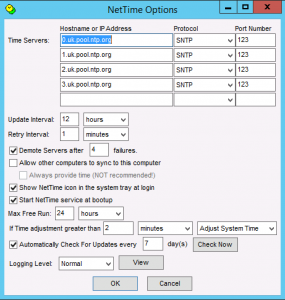
Click “Settings…” to choose NTP servers and synchronization options.

Screen Shot 2015-10-07 at 12.05.21 PM

That’s it! NetTime will run in the background as a Windows Service, and will automatically start when the system is rebooted, keeping your system clock synchronized at all times.

This guide applies to:

  • Windows Server 2012 R2 / Windows 8
  • Windows Server 2008 R2 / Windows 7
  • Windows Server 2003 R2 / Windows Vista / Windows XP
Posted in Guides & How To's, Tech Support, VPS Hosting, Windows Server, Windows VPS | Tagged , , , , , | Leave a comment

How to Install Plesk on a Linux or Windows Server, or VPS

Plesk is an excellent web hosting control panel suite for Windows and Linux systems, featuring automated management of websites, domains, email accounts, databases, and more. 

To install Plesk on your Linux VPS, Windows VPS, or dedicated server, follow the steps below.

Download and Run the Plesk Installer

Choose the download link for your server’s operating system:

Run the installation package. It will start an automatic installation utility and you will be guided through the installation process. 

Log in to Plesk Panel

Once the installation has completed, you can access Plesk in any browser by navigating to the following address, where “0.0.0.0” is replaced with your server’s IP address, or domain name (if configured).

https://0.0.0.0:8443

Log in to Plesk with the credentials of the system admin user. The username is “root” on Linux systems, and “Administrator” on Windows systems, with the password you chose during installation. 

Plesk is compatible with a wide range of operating systems, including:

  • CentOS 5 (x86 & x64)
  • CentOS 6 (x86 & x64)
  • CloudLinux 5 (x86 & x64)CloudLinux 6 (x86 & x64)
  • Debian GNU Linux 6 (x86 & x64)
  • Debian GNU Linux 7 (x86 & x64)
  • Redhat Enterprise Linux 5 (x86 & x64)
  • Redhat Enterprise Linux 6 (x86 & x64)
  • openSUSE 12.2 (x86 & x64) (EOL: January 15, 2014)
  • openSUSE 12.3 (x86 & x64)
  • Ubuntu 10.04 (x86 & x64) (EOL: April 11, 2015)
  • Ubuntu 12.04 (x86 & x64)Windows Server 2008 SP2 (Standard, Enterprise, Datacenter editions)
  • Windows Server 2008 R2 SP1 (Standard, Enterprise, Datacenter editions, and Windows Web Server) 
  • Windows Server 2012 (Standard, Foundation, Datacenter editions)

Get a Free Trial License

Want to try out Plesk before buying a license? To get a free 15-day trial license for Parallels Plesk Panel, just click here to request a license from Parallels.

Want free installation?

We provide instant setup, free installation, and ongoing support for Plesk 12 on both Windows and Linux servers. Check out our Linux VPS hosting and Windows VPS hosting packages, all available with Plesk.

Posted in Guides & How To's, Linux VPS, Tech Support, VPS Hosting, Windows Server, Windows VPS | Tagged , , , , , , | 1 Response

Removing Roles/Features from Windows Server 2012 R2 [How To]

In Windows Server 2012 R2, the option to remove Roles and Features is a bit obscure, or at least not where you might look initially.

First, launch Server Manager from the Start menu.

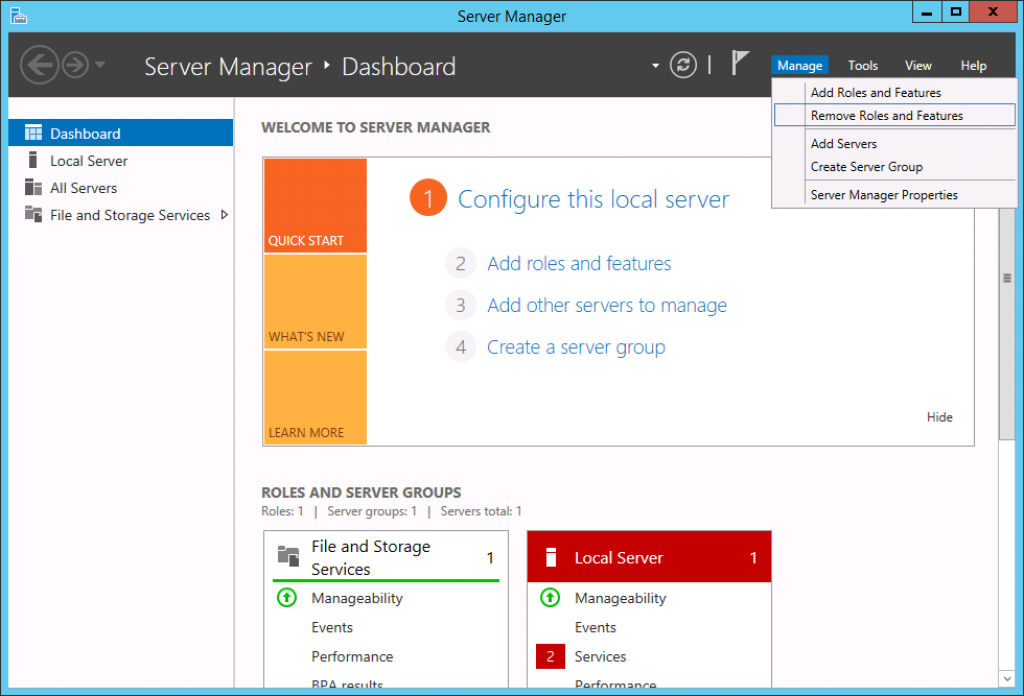
Now, you can find Remove Roles and Features from the Manage menu along the top navigation options. From the Remove Roles and Features dialog, simply select the packages you would like to remove and proceed through the removal wizard.

Screen Shot 2015-10-02 at 11.40.54 AM

This guide applies to:

  • Windows Server 2012 R2
  • Windows 8.1
Posted in Guides & How To's, Tech Support, VPS Hosting, Windows Server, Windows VPS | Tagged , , , , | Leave a comment


Questions? We're here to help.